Migrate specific MySQL databases using Database Migration Service
Holly Xu
Software Engineer Cloud SQL Data Migration
Somdyuti Paul
Data Management Specialist
When you’re looking to migrate to Cloud SQL, our fully managed relational database service for MySQL, PostgreSQL, and SQL Server, you may want to migrate all data or a subset of data from your source instance. Google Cloud’s Database Migration Service (DMS) provides an easy way to migrate all tables from all databases and schemas. However, it can be hard to tell how to migrate only selected databases or tables using the tool.
In this blog, we will walk through solutions to migrate a subset of databases and tables from different types of potential sources, including on-premises MySQL, Cloud SQL for MySQL, and Amazon RDS for MySQL. All of the MySQL instances in this example have multiple databases configured in the source MySQL instance. This process requires that you have binary logs enabled on your source instance.We'll show how to migrate all of the following:
-
MySQL running on-prem, including instances that have GTID enabled or disabled.
-
Cloud SQL for MySQL with GTID enabled.
-
AWS RDS MySQL with GTID enabled.
The target will be a Cloud SQL for MySQL instance. Let’s take a deeper look at each type of migration.
MySQL running on-premises
Suppose your source MySQL instance has two databases (test and test1) as below and you want to migrate only the ‘test’ database to Cloud SQL for MySQL using DMS.
To migrate one or more specific databases from an on-prem MySQL instance, there are four steps involved:
-
Use mysqldump to take an initial consistent snapshot.
-
Transfer the manual dump file to Google Cloud Storage bucket.
-
If migrating to a new or existing Cloud SQL for MySQL instance, set the replicate_do_db replication filter flag.
-
Configure a Database Migration Service continuous migration job and perform initial load from the Cloud Storage bucket.
Let's go through each of these steps using the scenario above.
1. Use mysqldump to take a consistent initial snapshot
You'll start by using mysqldump to take an initial dump at a consistent snapshot and get the binlog coordinates used to set up replication. You'll need to use the following three options:
-
single-transaction - takes a consistent snapshot in a repeatable read transaction
-
master-data=1 - writes a "CHANGE MASTER TO" statement to the dump file
-
set-gtid-purged=AUTO - writes GTID info based on the gtid_mode on the source instance
The privileges needed for the replication user/user performing mysqldump are:
-
RELOAD (for FLUSH tables to acquire Global Read Lock)
-
REPLICATION_CLIENT (for SHOW MASTER STATUS)
-
SELECT
-
SHOW VIEW
With those options specified, the statements that will be executed by mysqldump are as below:
-
FLUSH LOCAL TABLES
-
FLUSH TABLES WITH READ LOCK
-
SET SESSION TRANSACTION ISOLATION LEVEL REPEATABLE READ
-
START TRANSACTION
-
SHOW VARIABLES LIKE 'gtid_mode'
-
SELECT @@GLOBAL.GTID_EXECUTED
-
SHOW MASTER STATUS
-
UNLOCK TABLES
-
transaction continues to dump all tables and views
In addition, REPLICATION_SLAVE is also needed if the same user sets up replication from the Database Migration Service.
If your source MySQL instance is version > 8.0.26, use source-data=1 instead of master-data=1. The above mysqldump options take a consistent data dump, capturing the GTID state at the beginning of the backup (for instances that have GTID enabled) and recording the binlog coordinates from which to start replication.
2. Transfer the manual dump file to the Cloud Storage bucket
The below mysqldump command takes a manual dump of the “test’’ database and transfers it to the Cloud Storage ‘mysqldumpsom’ bucket.
If the source has GTID configured, the dump file writes GTID information to set up GTID-based replication with statement SET @@GLOBAL.gtid_purged=<gtid executed> (SELECT @@GLOBAL.GTID_EXECUTED)
For binlog-based replication, the following information is written to a dump file (because of master-data=1 in mysqldump).
3. Set replication filter in the Cloud SQL instance
You have two options when migrating to Cloud SQL using Database Migration Service - you can create a new instance when you kick off the process or you can select an existing, empty Cloud SQL instance.
For this example, where you want to migrate only the "test" database, you need to set the "replicate_do_db" flag to specify which database you want to migrate. This flag is a replication filter that tells the Cloud SQL replica to read only the statements from the relay log that are for the specified database. If you're creating an instance through DMS, you can set this flag during the "Define a Destination" step.
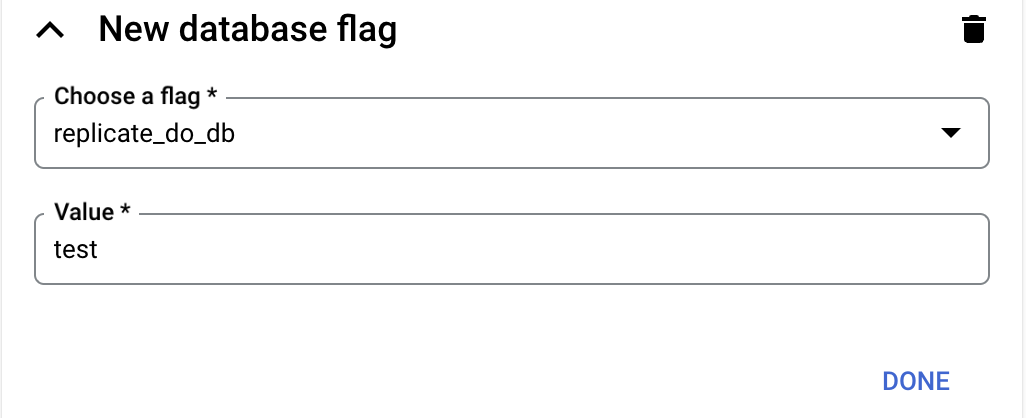
If you're using an existing instance, you can set this flag once DMS demotes the Cloud SQL instance and converts it to a read replica. Remember that this flag cannot be set when the instance is in standalone mode. If you are replicating multiple databases at once, set this flag value to a comma separated list of all databases that are being migrated.
4. Configure the Database Migration Service continuous migration job
When creating the Database Migration Service job, during the ’Describe your migration job’ section, select ‘Continuous” as the Migration Job type. In the next screen of Database Migration Service in ‘Define the Source’ section specify the Manual dump location as below
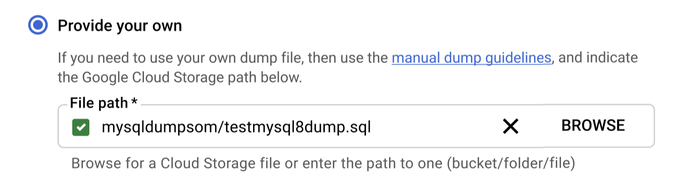
Database Migration Service will import the data to your Cloud SQL instance which you specified during ‘Define a Destination’ and will perform Continuous Replication (CDC) from on-premises MySQL database until you decide to perform a promotion.
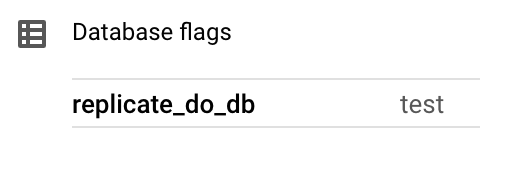
The destination Cloud SQL for MySQL instance will have only the selected database replicated as seen below.
Cloud SQL for MySQL with GTID-based replication
You may need to migrate specific databases from an existing Cloud SQL for MySQL instance. Or, for the purpose of workload isolation, you may want to move a database from a multi-database Cloud SQL instance to a new Cloud SQL for MySQL instance. The steps you take will be similar to taking mysqldump from an on-premises MySQL Server. If you are performing the mysqldump as the ‘root’ user, no additional privileges need to be given, as Cloud SQL for MySQL ‘root’ user has the necessary privileges. The below command confirms the same.
Since Cloud SQL for MySQL uses GTID, the dump file has the entries “SET @@GLOBAL.gtid_purged=<gtid executed>” as explained earlier.
Once the DMS job is set up and it is in replicating state, the GTID purged information in the target Cloud SQL instance is the same as GLOBAL.GTID_PURGED value, which was captured in mysqldump file.
The below command confirms the same.
AWS RDS MySQL with GTID-based replication
As mentioned in this post, AWS RDS users can’t execute “FLUSH TABLES WITH READ LOCK”, which is required by mysqldump when running with --master-data=1 and --set-gtid-purged=AUTO which we suggest using together with --single-transaction to get a consistent binary log position. Here we provide a workaround solution to migrate from AWS RDS read replica.
Migrating from an AWS RDS read replica
The steps to migrate from an AWS RDS read replica are similar to migrating from on-premises or Cloud SQL, with the addition of some steps to stop replication on the source.
1. Enable binary logging in the RDS read replica by enabling automated backup. It is also advised to set binlog_format to “ROW”; you can enable it by updating the DB parameter group of the primary instance.
2. Update the binary log retention configuration to specify a period with enough time for replication to occur.
3. Now we are ready to start the data dump. First stop replication on the RDS read replica so that data is consistent.
4. Use below mysqldump to take the initial snapshot and store it in a local file.
5. Run “SHOW MASTER STATUS” command on the RDS read replica to retrieve the current Executed_Gtid_Set.
6. Once the dump file is generated, we can resume replication on the RDS read replica.
7. Manually update the local dump file to include the below statements:
8. Transfer the local manual dump file to Google Cloud Storage bucket and migrate.
The rest of the steps are the same as migration from on-premises or Cloud SQL.
Conclusion and what’s next
In this blog, we walked you through how to migrate selective MySQL databases to empty Cloud SQL instances using mysqldump and DMS. Migration time will be limited by mysqldump, as it is a single threaded process. In upcoming blogs, we’ll show you how to parallelize the initial dump process while doing selective MySQL database migrations, and also how to migrate databases to non-empty Cloud SQL instances. Check out this resource to get started with Cloud SQL Quickstart: Connect to Cloud SQL for MySQL from Cloud Shell | Google Cloud. Check out this resource to learn more about database migration.