Your guide to CCAI Platform: The CCaaS that empowers agents and delights customers
Avani Vyas
Cloud Consultant, AI
Are you tired of clunky, outdated contact center software that exasperates your agents and leaves your customers frustrated? Google Cloud’s Contact Center AI Platform (CCAI Platform) is here to help. This platform is designed to empower your agents, streamline your operations, and elevate the customer experience.
In this beginner-friendly guide, we'll walk through the ins and outs of CCAI Platform, from setting up your account to mastering its core features. No tech jargon, no complex setups – just a simple, straightforward introduction to a platform that can transform the way you do business.
Who is this guide for?
-
Businesses looking for a modern, AI-powered contact center solution
-
Contact center managers and supervisors seeking to improve efficiency and customer satisfaction
-
Agents who want to work with a platform that makes their jobs easier and more rewarding
If you're ready to unlock the full potential of your contact center, then let's dive into the world of CCAI Platform!
What is CCAI Platform?
CCAI Platform is a CCaaS (Contact Center as a Service) providing a cutting-edge solution that reimagines how businesses interact with their customers. It's a comprehensive solution that brings all your digital and voice communication channels into a single, user-friendly application.
Prior to the introduction of the Contact Center AI Platform (CCAIP), Google Cloud offered a suite of individual AI-powered services designed to enhance various aspects of the contact center experience.
-
Virtual Agent: This component provided Conversational AI capabilities, allowing businesses to automate customer interactions through chatbots and voice assistants. Virtual agents could handle routine inquiries, provide basic support, and even complete simple transactions, freeing up human agents to focus on more complex issues.
-
Agent Assist: Designed to empower human agents, Agent Assist provided real-time suggestions, knowledge base articles, and other relevant information to help agents resolve customer issues quickly and efficiently. It leveraged natural language processing (NLP) to analyze conversations and anticipate customer needs.
-
Insights: This service harnessed the power of data analytics to provide valuable insights into contact center performance, customer sentiment, and operational efficiency. Insights helped businesses identify trends, uncover areas for improvement, and make data-driven decisions.
While these individual services are valuable in their own right, they’ve often required integration with existing contact center infrastructure, which can be complex and time-consuming. Additionally, businesses might need to rely on multiple vendors or technologies to achieve a complete end-to-end contact center solution.
The Contact Center AI Platform is a comprehensive, unified solution to address these challenges. CCAI Platform brings together Virtual Agent, Agent Assist, and Insights under one umbrella, providing a seamless, integrated experience for both agents and customers. This means that businesses no longer need to piece together disparate solutions from different providers. Instead, they can rely on Google Cloud for a complete, end-to-end contact center platform with all the AI-powered tools they need to deliver exceptional customer service.
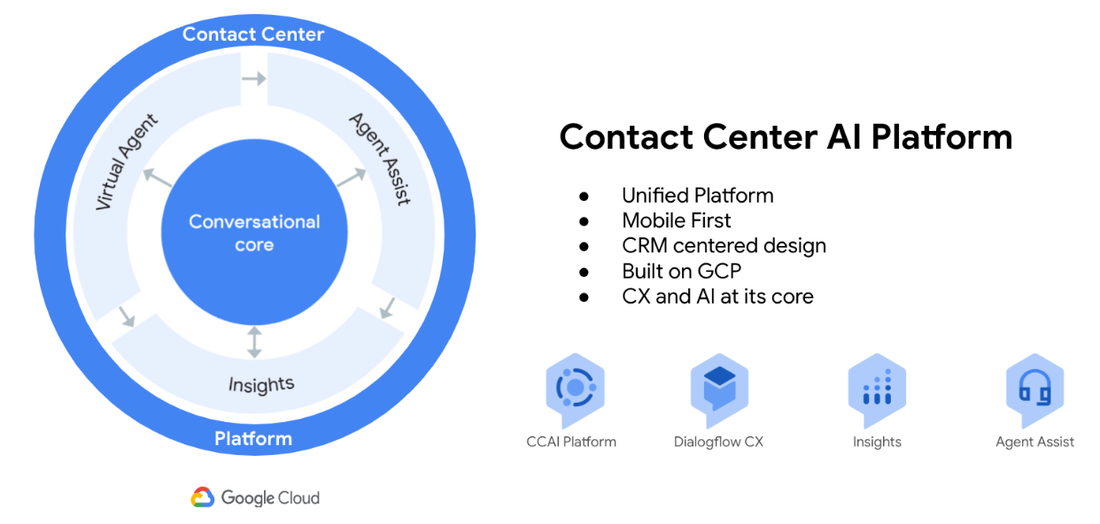
CCAI Platform: A Unified Solution
This unified approach simplifies deployment and management, while also ensuring a consistent experience across all channels. By consolidating these services into a single platform, Google Cloud empowers businesses to accelerate their adoption of AI in the contact center and streamline their customer service operations.
Why Should You Consider It?
-
Unified Communication: No more juggling different tools and systems. CCAI Platform gives your agents a single interface to manage all customer interactions, making their jobs easier and boosting productivity.
-
Mobile-First Design: Customers expect to reach you wherever they are. CCAI Platform's mobile-first approach ensures your contact center is accessible on the devices your customers use most.
-
AI-Powered Insights: CCAI Platform goes beyond basic call handling. It analyzes customer conversations, providing valuable insights into sentiment, common issues, and areas for improvement. This allows you to personalize experiences and proactively address problems.
-
Enhanced Agent Experience: With a CRM-centric design, CCAI Platform puts all customer information at your agents' fingertips, enabling them to provide more informed and efficient support.
-
Streamlined Workflows: Automate routine tasks, such as call routing, freeing up your agents to focus on what they do best: building relationships with your customers.
-
Scalability: Whether you're a small business or a large enterprise, CCAI Platform can grow with you, adapting to your changing needs and helping you stay ahead of the curve.
-
Security: Built on the robust Google Cloud Platform (GCP), CCAI Platform offers top-notch security to protect your data and your customers' privacy.
Getting Started with CCAI Platform
Here's a step-by-step walkthrough of the initial setup process:
Step 1: Creating Your CCAI Platform Account
Before you can dive into CCAI Platform's features, you'll need to create a CCAI Platform instance within the Google Cloud Platform (GCP) console. Here's what you need before getting started:
-
Quota: Ensure you have the necessary quota granted for the CCAI Platform instance size (shirt size, based on number of agents) you plan to use. This determines the resources allocated to your instance. If you require quota, you can reach out to your Google Cloud Account team for assistance.
-
Permissions: You'll need a "Contact Center AI Administrator" role within your GCP project to create and manage CCAI Platform instances.
Here's how to create a CCAI Platform instance:
1. Access the GCP Console: Log in to your Google Cloud Platform account. If you don't have one, you'll need to create it first. In order to create Google Cloud Platform account follow these steps:
-
-
Visit the GCP Console website by typing the following URL in your browser's address bar: https://console.cloud.google.com/
-
If you already have a Google account: Enter your email and password associated with your Google account.
-
If you don't have a Google account: Click on "Create account" and follow the instructions to set up a new one.
-
Once logged in, select your country, read and accept the “Terms of Service” and click “AGREE & CONTINUE.”
-
Enter your billing information.
-
You will be taken to the GCP console dashboard. You will need to create a project first to get started.
-
Now that you've created a project within your GCP account, you're ready to start setting up your CCAI Platform instance!
2. Search for CCAI Platform: Use the search bar at the top of the GCP console and type "CCAI Platform."
3. Create Instance: Click on the "Contact Center AI Platform" result and then click the "Create Instance" button.
4. Configure Your Instance: You'll be presented with a configuration form where you need to provide the following:
-
-
Instance Name: Give your CCAI Platform instance a unique and descriptive name.
-
Region: Choose the geographical region where you want your instance to be deployed.
-
Domain Prefix: This is the subdomain that will be used for your CCAI Platform instance's URL (e.g., "yourcompany.region.ccaiplatform.com").
-
Instance Size: Select the appropriate size based on your expectations. CCAI Platform uses "shirt sizes" (Small (up to 250 agents), Medium (up to 1,600 agents), Large (up to 3,800 agents) and so on) to indicate resource levels.
-
User Authentication: Decide whether you want to use email-based login or Single Sign-On (SSO) via SAML for your users.
-
5. Review and Create: Double-check your settings and click "Create" to start the instance creation process.
Once you click "Create," the instance creation process will begin. This typically takes about an hour, but it can sometimes take longer depending on various factors. You'll receive a confirmation email when your CCAI Platform instance is ready, providing you with the necessary information to access your new contact center platform.
Step 2: Accessing the CCAI Platform
After you've successfully created your CCAI Platform instance, it's time to access the platform and start exploring its capabilities.
-
Welcome Email: After creating your account, you'll receive a welcome email with a link to access your CCAI Platform dashboard.
-
Login: Click the link and use your Google account credentials to log in.
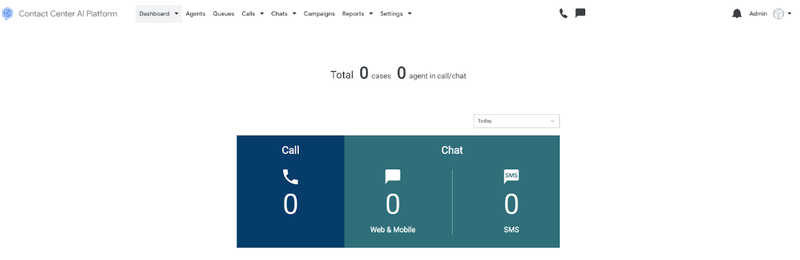
Once you've successfully logged in, you'll be greeted by the CCAI Platform dashboard, your central hub for managing your contact center. This is where you'll monitor activity, access reports, and configure settings to optimize your customer interactions.
Step 3: Understanding the CCAI Platform Interface
Navigation Menu
Explore the navigation menu, typically located on the side or top of the screen. This is where you'll find links to all the key sections of CCAI Platform, such as:
-
Dashboard: The dashboard is your command center, providing real-time insights into call, chat, and virtual agent activity across all channels. You'll see key metrics like current interaction volume, agent availability, queue wait times, and more, giving you a comprehensive overview of your contact center's performance.
-
Agents: Keep tabs on your team's activity. Live monitoring lets you see who's available, on a call, offline, or in a wrap-up session, helping you manage your team's workload and availability.
-
Queues: Monitor queues for different channels (voice, chat). You'll see how many interactions are waiting in each queue and how long customers have been waiting.
-
Calls & Chats: These sections list all the connected, queued and completed entries, allowing you to quickly access details about specific calls or chats for further analysis or action.
-
Campaigns: See any campaigns (outbound calling, automated messaging etc) that are currently running and monitor their progress.
-
Reports: Dive into your data with customizable reports. Analyze key metrics like customer satisfaction and call resolution rate. These insights can help you identify areas for improvement and make data-driven decisions to optimize your contact center.
-
Settings: Fine-tune your contact center's configuration. Adjust call routing rules, customize your IVR menus, and set up business hours.
-
Call & Chat Adapter: Easily respond to calls and chat conversations with the click of an icon. The telephone icon connects you to the audio system, while the chat icon opens a text chat window.
-
User Profile : Manage your personal settings, such as your profile photo and basic information.
Note: The features available in the navigation menu may vary depending on your role and permissions within CCAI Platform.
With the navigation menu as your guide, you can seamlessly access all the essential tools and information needed to manage your CCAI Platform contact center. Whether you're monitoring live interactions, analyzing historical data, or fine-tuning your settings, this user-friendly interface puts you in control of your customer service experience. Take some time to explore each section and familiarize yourself with the powerful capabilities that CCAI Platform has to offer.
Step 4: Configuring Basic Settings
Within the "Settings'' section of the navigation menu you’ll find these:
Support Center Details
-
Support Center Name: This is the internal name you'll use to identify your contact center within CCAI Platform.
-
Display Name: This is the name that your customers will see in your support applications (like chat widgets or contact forms). Make it clear and recognizable to your brand.
-
Hours of Operation: Set the days and times when your contact center is open. This will determine when agents are expected to be available and when calls or chats will be routed.
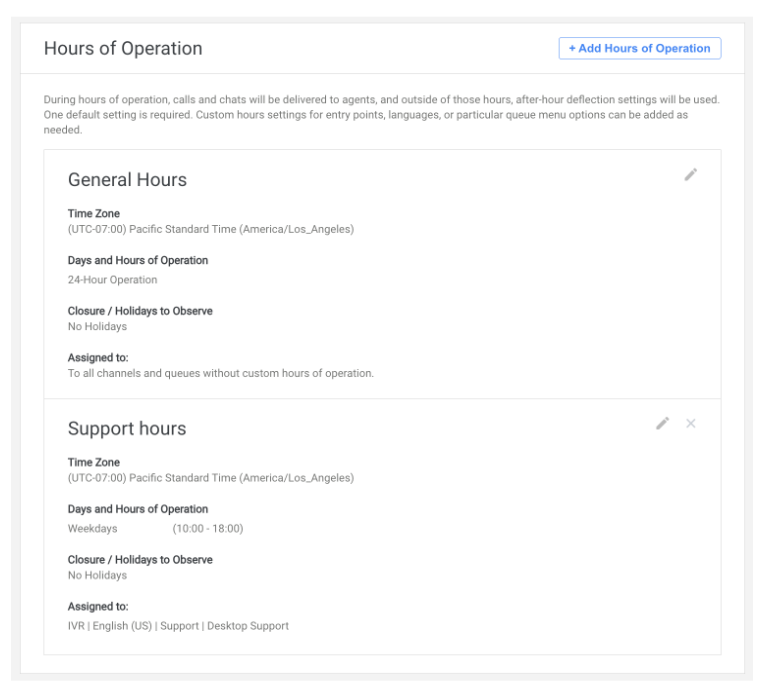
You can create multiple schedules for different days or even for holidays.
Additionally, within "Support Center Details," you can configure various aspects of your contact center's identity and functionality. You can set up your support email address, which will be used for automated email notifications and responses.
Languages & Messages
-
Default Language: CCAI Platform typically starts with English (US) as the default language.
-
Adding New Languages: If you serve customers who speak other languages, click "Add Language" and choose from the list of available options.
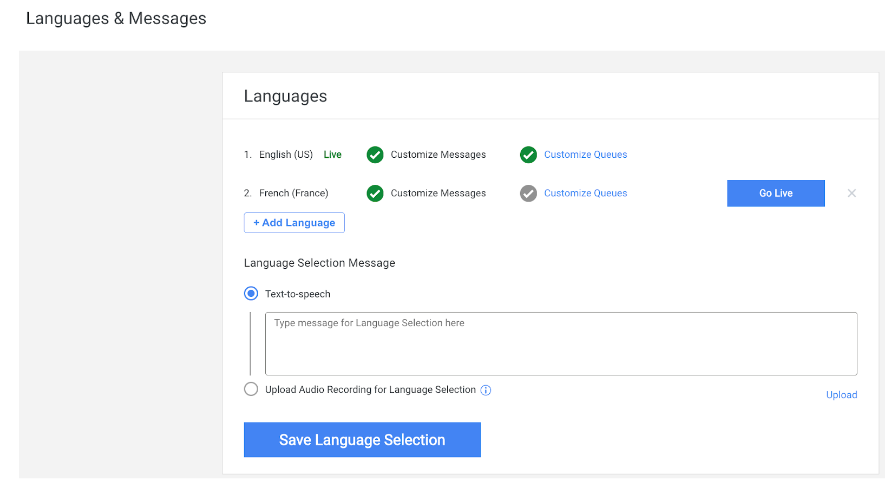
To ensure your message reaches a global audience, CCAI Platform allows you to provide multilingual support. By adding languages that your customers speak, you can create a more inclusive and positive customer experience. This can lead to increased customer satisfaction, loyalty, and trust in your brand. Once you've added a new language, remember to customize greetings, IVR scripts, and other messages to ensure your customers receive support in their preferred language.
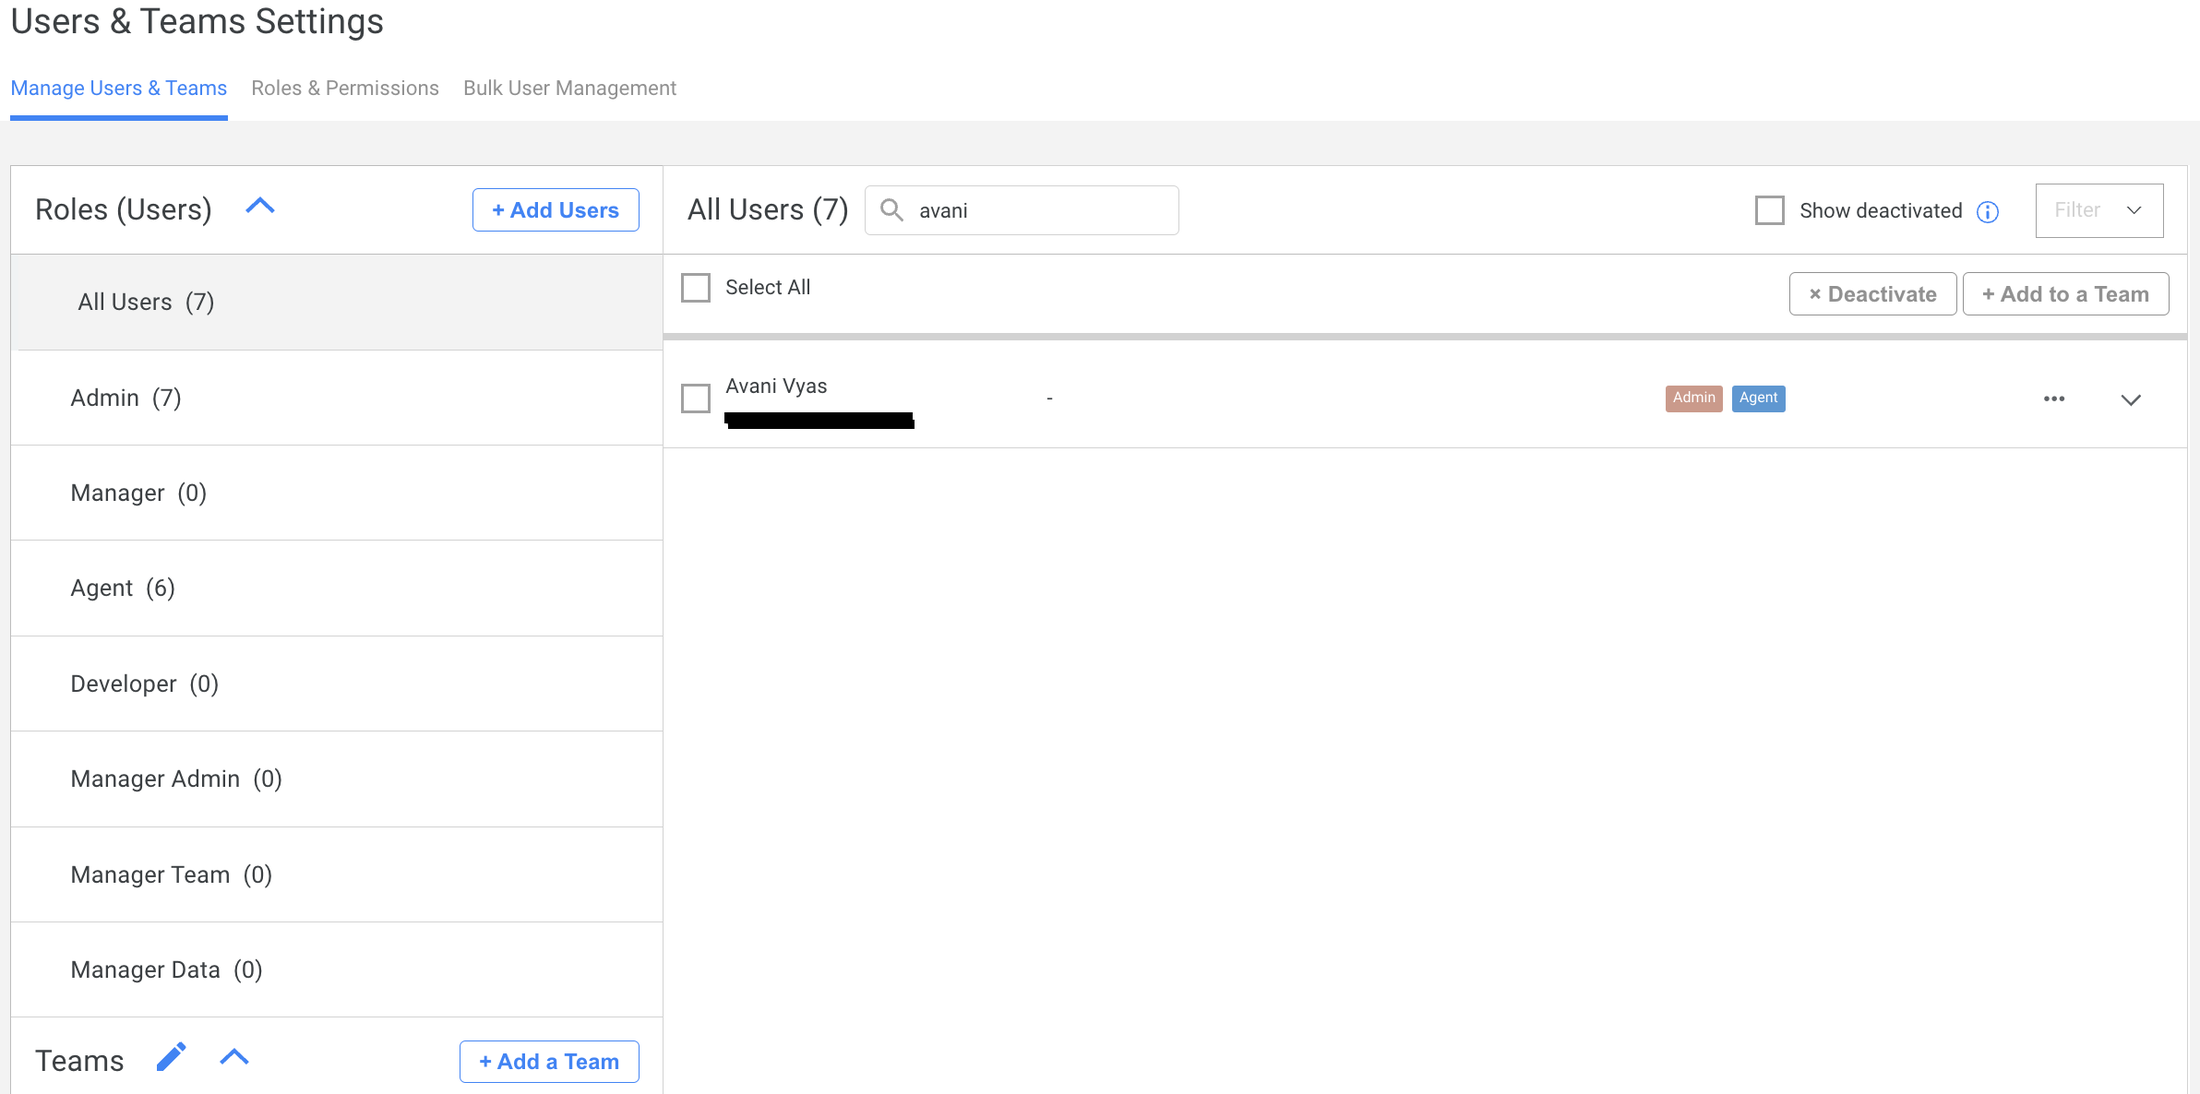
Users & Team Settings
This is where you'll manage the people who will be using CCAI Platform, whether they're agents handling customer interactions or supervisors overseeing the contact center's performance.
Manage Users & Teams Tab
-
Add Users: To bring new users onboard, click the "Add Users" button. You'll be prompted to enter their:
-
Email Address: This is their primary identifier and login information.
-
First and Last Name: For clear identification within the system.
-
Location (Optional): If you have multiple locations, you can assign users to specific ones.
-
Roles: This determines what permissions the user has within CCAI Platform. Common roles include Admin, Manager, Agent and Developer.
-
Create Teams: Organizing your users into teams helps streamline workflows and reporting. You can group users based on skill sets (e.g., technical support vs sales), location, shifts, or any other criteria that makes sense for your business.
-
Benefits of Teams:
-
Queue Assignment: Easily assign teams to specific queues to ensure calls and chats are routed to the right people.
-
Data Access: Control which data each team can see, so agents only have access to the information relevant to their role.
-
Reporting: Generate reports on team performance to track productivity and identify areas for improvement.
By effectively organizing your users into teams and assigning them relevant roles, you can establish a structured and efficient contact center environment within CCAI Platform. This will not only streamline your workflows and reporting but also ensure that the right agents are handling the right interactions, ultimately leading to improved customer satisfaction and overall performance.
Queue
In CCAI Platform, queues are how you manage incoming customer interactions. Think of them as virtual waiting lines where customers wait to be connected with an agent. You can set up different queues for various channels, ensuring efficient handling of all communication types. Queues help ensure that customers are served in a fair and efficient manner.
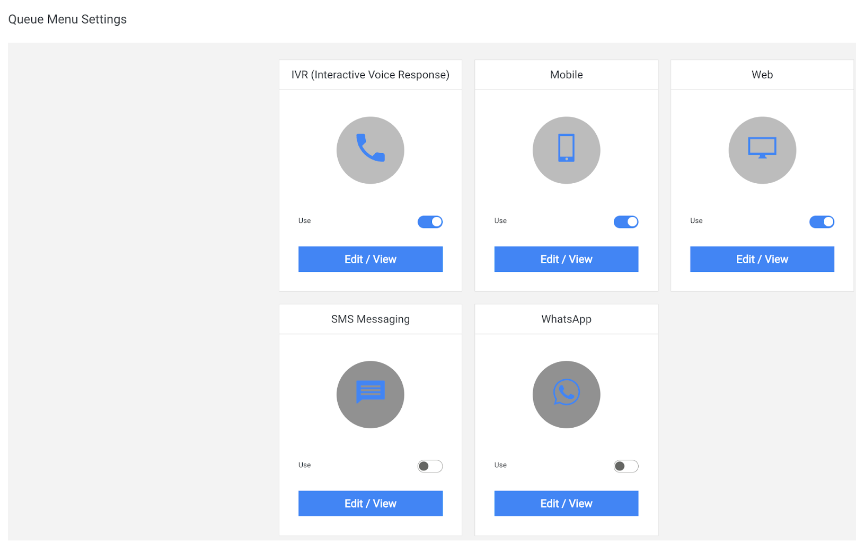
Queue Settings:
-
Access Queue Settings: Navigate to "Settings" in the navigation menu and select "Queue."
-
Queue Menu Settings: You'll see a list of available queue types, including:
-
IVR Queue: For interactions initiated through phone calls (telephony).
-
Mobile Queue: For interactions originating from mobile devices.
-
Web Queue: For interactions through your website or web chat widget.
-
SMS Messaging: For text message-based conversations.
-
WhatsApp: For interactions on the WhatsApp messaging platform.
-
Activate Queues: Toggle the "Use" button to activate the queues you want to use in your contact center.
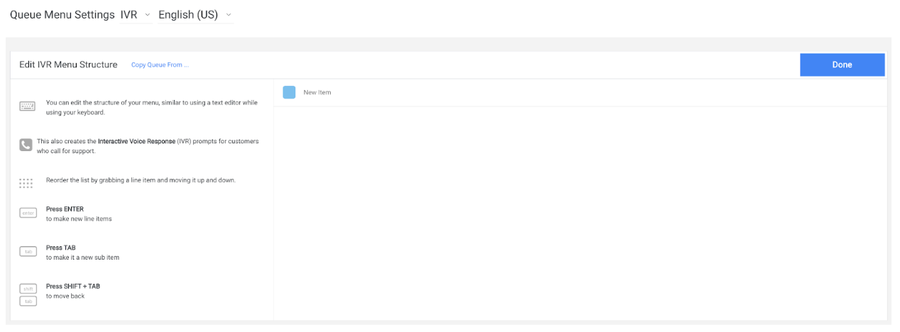
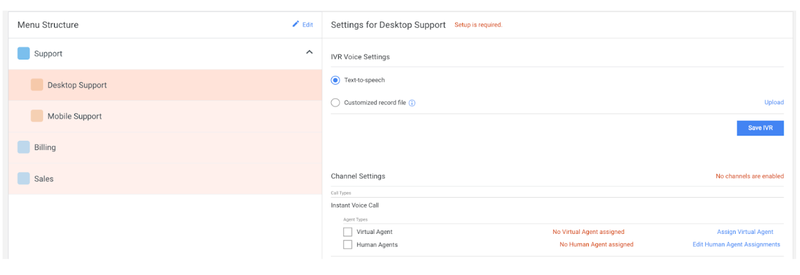
Setting up an IVR Queue:
-
Edit IVR Menu Structure: Click "Edit/View" under the IVR Queue section and then click "Edit." This will open the IVR menu editor.
-
Add Queue Items: In the editor, you'll see a placeholder labeled "New Item." Start typing your desired queue name and press Enter. A new item will appear for you to create additional queues.
-
Edit Existing Queues: Click on any existing queue name to modify its settings.
-
Edit Human Agent Assignments: Within the queue settings, click on "Edit Human Agent Assignments." This will allow you to add individual agents or entire teams to the queue.
By understanding and configuring queues effectively, you can streamline your contact center's operations, minimize wait times, and ensure that each customer interaction is routed to the most qualified agent. This not only enhances customer satisfaction but also empowers your agents to deliver efficient and personalized support.
Step 5: Test your call center with a dry run
Before going live, it's crucial to test your call center setup to ensure everything is working as expected. CCAI Platform makes this easy with a built-in dry run feature.
How to Perform a Dry Run:
- Locate Your Call Center Number: Navigate to the "Settings" section in the navigation menu and select "Call." Here, you'll find the phone number associated with your CCAI Platform instance.
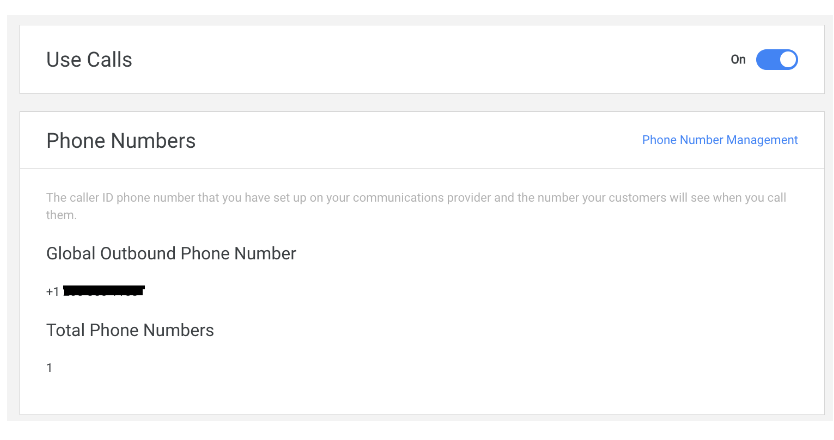
-
Dial the Number: Use your phone (or any phone with calling capabilities) to dial the number displayed.
-
Experience the IVR: You'll be greeted by your Interactive Voice Response (IVR) menu, just as your customers would be.
This will allow you to navigate through the menu options, listen to greetings and messages, and test how calls are routed. It's a great opportunity to identify any potential issues or areas for improvement before your contact center goes live. Make note of any unexpected behavior or errors you encounter during the dry run so you can address them before your customers experience them.
Modernize your contact center
As you continue to explore CCAI Platform, you'll discover a wealth of advanced features and customization options to further tailor the platform to your specific needs. From intelligent routing to sentiment analysis, CCAI Platform is constantly evolving to help you stay ahead of the curve — to learn more, click here.