Here's how to set up Google Meet hardware for your company or group.
Step 1: Read your welcome email
Before you turn on and enroll any devices, read the information in your welcome email. Your welcome email has information about licenses and how to access the Google Admin console.
You need a license for each device you want to enroll. To check how many device licenses you have:
-
Sign in to your Google Admin console.
Sign in using your administrator account (does not end in @gmail.com).
-
Go to Menu
Devices
Google Meet hardware
- At the left, under More, the License management section will describe how many licenses are in use.
Step 2: Review requirements
Make sure the room, network, and other components are ready to go. Review the Google Meet hardware requirements.
Step 3: For large deployments, start a spreadsheet tracker
If you’re setting up many devices, we recommend that you create a project spreadsheet that lists all video conference rooms where the devices will be installed. To make device tracking and enrollment easier, use that spreadsheet to track room and device information, such as the following:
- Region
- Office
- Location
- Department
- Conf Room/Resource Name
- Room Size
- Ethernet Port/Wireless
- Device Serial #
- Display Type with HDMI/DVI
- Delivery Date
- Enrollment Date
- Installation Date
- Verification Date
Step 4: Set up the hardware
For guidance on how to install Meet hardware, refer to our Room design guide.
Google Meet Hardware and Chrome OS devices are not interchangeable. That is, you can't convert Chromeboxes or Chromebases purchased with standard ChromeOS to a video conferencing system. Similarly, you can't convert or use Google Meet hardware devices as ChromeOS devices.
Set up your hardware by following the steps:
- Unbox your hardware.
- Ensure that no items are missing or damaged. If needed, contact the manufacturer or your Google reseller. Refer to information on the package or the following content lists.
Note: Meet hardware kits don’t include display monitors.
Quick Start Guides are included with each kit:
Series One hardware uses power over ethernet (POE) for connections between devices. Cables are included with the hardware in the following lengths:
| Device type | Cable length | Cable type |
|---|---|---|
| Smart camera Lite | 2m (6.5ft) | CAT 5E UTP 28AWG |
| Smart camera XL | 2m (6.5ft) | CAT 5E UTP 28AWG |
| Smart audio bar | 2m (6.5ft) | CAT 5E STP 28AWG* |
| 5m (16.5ft) | CAT 5E UTP 28AWG | |
| Add-on audio bar | 2m (6.5ft) | CAT 5E UTP 28AWG |
| Mic pod | 2m (6.5ft) | CAT 5E UTP 28AWG |
| Meet touch controller | 5m (16.5ft) | CAT 5E UTP 28AWG |
| Meet compute system | 2m (6.5ft) |
CAT 5E UTP 28AWG |
*CAT5E STP or higher for compute box to smart audio bar only
Each cable length can be extended in accordance with TIA/EIA 568-C.2 standards to support a wide range of installation scenarios. Please refer to these guidelines when planning your installation:
- CAT5E or higher.
- 24AWG or higher is recommended for cable lengths longer than 10m.
- Cables that are terminated on-site from bulk cables must be certified to CAT5E or higher using a cable tester.
- Patch connections from bulk cabling can be used if the total point-to-point cable run is certified, tested, and does not exceed TIA/EIA 568-C.2 standards.
Depending on the model, your Google Meet hardware kit can contain:
- Chromebox
- Camera
- Google Meet speakermic and touchscreen controller
- Getting started guide
- Mounting bracket
- Mounting hardware
- Table mat
- Camera USB cable
- Speakermic cable
- Touchscreen mini-HDMI cable (green)
- Touchscreen mini-USB data cable (blue)
- Touchscreen micro-USB power cable (red)
- Chromebox power cable
Logitech Meet hardware kit installation guide with content list
Go to the Logitech Google Meet installation guide.
Poly Studio X installation guide with content list
Google Meet hardware speakermic guide and content list
The Google Meet speakermic contains:
- Google Meet speakermic
- Speakermic power cable and wall adapter
- Ethernet cable to connect multiple speakermics
For more information, go to the Google Meet speakermic Quick Start Guide PDF.
Chromebase for Meetings contents
- Chromebase for Meetings device
- Quick start guide & warranty card
- User manual (Acer website)
- Keyboard & mouse (included, but not required for use)
- Power adapter
Google Meet Series One Desk 27 and Board 65 quick start guides
- Record the serial number of your device. You need the serial number for the following reasons:
- When you contact support.
- To help you find your device in the Admin console.
Meet hardware kits include a card with the device’s serial number. Keep the card and note the room where the device was installed. For large deployments, add the device information to your tracking spreadsheet
- Install the device and any displays and peripherals in the room. For guidance on how to arrange hardware, go to the:
(Optional) Mount your chromebase
Your Chromebase can be fitted with an optional VESA-compatible mount that allows you to mount it on a wall or your own base.
To mount your Chromebase for meetings device:
- Use a paperclip to detach the two-piece VESA cover on the back of your Chromebase. Loosen the screws with a standard Phillips-head screwdriver and remove the stand.
- Attach the mount using the VESA holes on the back of your Chromebase.
- Follow the instructions provided with the wall mount to secure your Chromebase to your Vesa-compatible mount.

- Connect cables to the device as shown in the quick start guide or product documentation. Connect to power last. For best sound and video, connect your device to a wired internet connection. Ensure Cat 5e cables are properly connected.
Series One cable diagrams for small, medium, and large rooms

Medium room

Large room

Small room
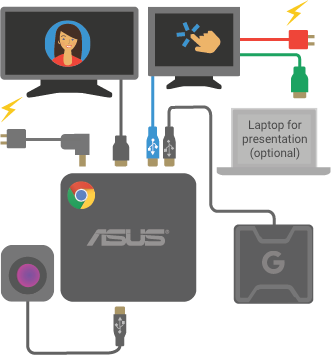
Large room
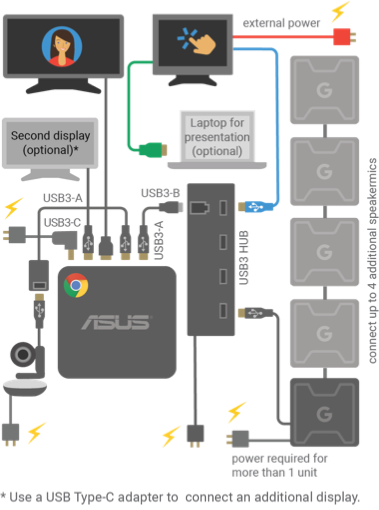
To print this diagram, download Welcome to your Google Meet hardware kit (pdf).
Tips
Connect the speakermic, monitor, and camera directly to the Chromebox or connect them to the Chromebox using qualified USB 3.0 hubs. Use the USB cable to connect the touchscreen directly to the Chromebox. For Chromebox CN65, the secondary video output is USB Type-C.
You can connect multiple speakermics to the Google Meet hardware. For more information, see the Meet speakermic Quick Start Guide.
Do not plug the HDMI cable from the touchscreen into the Chromebox. This cable is plugged in to your computer to present content only to the room. If both HDMI and Displayport are used, HDMI will act as the primary display.
In the CN65 hardware kit, the bundled power supply has a higher wattage. It's not compatible with older, existing power supplies.
Related topics
Step 5: Enroll your hardware in the Google Workspace Admin console
For next steps, go to Enroll your device.
Google, Google Workspace, and related marks and logos are trademarks of Google LLC. All other company and product names are trademarks of the companies with which they are associated.
