Process group detection
Dynatrace detects which processes are part of the same process groups by means of a default set of detection rules.
You can change the structure of default process groups by modifying the default process-group detection logic in:
-
Settings > Processes and containers > Process group detection section, which has the following pages:
- On the Built-in detection rules page, you can enable or disable specific process group detection toggles. Hover over the info icon to the right of each toggle for details.
- On the Simple detection rules and Advanced detection rules pages, you can add your own process group detection rules, which will override the default ones.
- On the Declarative process grouping page, you can monitor specific processes of a technology that is unknown to Dynatrace.
-
Settings > Processes and containers > Containers > Cloud application and workload detection, where you can define rules to merge similar Kubernetes workloads into process groups.
- Process group detection settings and rules require a restart of your processes to affect how processes are identified and grouped.
- Process group detection settings and rules only affect the composition of process groups. If you want to change how a process group is named, you have to use the process group naming rules instead.
- It's also possible to use host groups to separate clusters into different process groups.
Simple detection rules
Simple process group detection rules enable you to adapt the default process-group detection logic for deep monitored processes via Java system properties or environment variables. You can create a simple detection rule using the Dynatrace web UI or the Settings API - see Example JSON payload for a simple detection rule.
Simple process-group detection rules are only effective when OneAgent is installed on your hosts or images for processes that can be deep monitored.
This feature can only split a process group into multiple parts. Use it if you have different deployments into the same process group.
To create a simple detection rule in the Dynatrace web UI
-
Go to Settings.
-
Select Processes and containers > Simple detection rules.
-
Select Add item.
-
Set Property source to Java system property or Environment variable.
-
Set Group identifier to a value that Dynatrace will use to identify process groups.
-
optional Set Instance identifier to a value that Dynatrace will use to identify specific cluster nodes within a process group.
This setting is useful if your process group setup has specific names per node. If you're not sure, leave the field empty. The default setting is one node per host.
-
optional Set Restrict this rule to specific process types to the type of process to which you want to apply the rule.
-
Select Save changes.
Java system properties
With this option, you can create more fine-grained groups of Java processes.
The Java system property needs to be part of the Java command line to be detected by OneAgent. It can either be an existing system property that your application already uses (for example, three different jetty.home values for three different Solr clusters), or you can add a new system property. As long as the system property is available on the command line, Dynatrace can use it.
Environment variables
This option covers both Java and non-Java processes like NGINX, Apache HTTPserver, FPM/PHP, Node.js, IIS, and .NET. The environment variables that you select as process group identifiers must exist within the scope of the detected processes and be visible at application startup.
- For WebSphere, you can do this in the WebSphere console in the JVM section.
- For Tomcat and others, simply define the environment variable as part of the startup script.
We recommend creating environment variables specific to process detection. Environment variables that serve other scopes, such as DT_TAGS oder DT_CUSTOM_PROP, might cause incorrect or unintentional splits because all values of environment variables are evaluated for process-group detection.
Identifiers also serve as the default name for the detected process groups. See Define your own process group metadata for details on how to define an environment variable for IIS or for Windows services.
Example:
Suppose you have two nearly identical Apache HTTP server deployments that reside within the same deployment directory but on different hosts. By default, Dynatrace can't distinguish between the two deployments because they don't have any unique characteristics that can be used for identification. Now consider the following rule: Apache process identified by environment variable MY_PG_NAME.
Any Apache HTTP process that includes the environment variable MY_PG_NAME within its scope will use the content of "MY_PG_NAME" as both its identifier and its default name. In this scenario, you can have Dynatrace separately identify and name each deployment by assigning the environment variable MY_PG_NAME=dynatrace.com-production to one deployment, and MY_PG_NAME=dynatrace.com-staging to the other deployment.
Advanced detection rules
Advanced process group detection rules allow you to create a process group by merging processes from different groups, and enable you to adapt the detection logic for deep monitored processes by leveraging properties that are automatically detected by OneAgent during the startup of a process. You can create an advanced detection rule using the Dynatrace web UI or the Settings API - see Example JSON payload for an advanced detection rule.
Advanced process-group detection rules are only effective when OneAgent is installed on your hosts or images for processes that can be deep monitored.
To create an advanced detection rule in the Dynatrace web UI
-
Go to Settings.
-
Select Processes and containers > Advanced detection rules.
-
Select Add item.
-
In the Process group detection section, define to which processes this rule should be applied. For example, to a Java JAR file that contains
ws-server.jar. -
In the Process group extraction section, select which property value should be used within the process group detection.
-
Select whether you want the rule to be a standalone rule.
This option is not recommended in containerized environments, as out-of-the-box detection should take care of everything. For details, see Standalone rules.
-
In the Process instance extraction section, select if specific properties should be used to extract single process instances (nodes).
-
Select Save changes.
Standalone rules
When to enable this option
Suppose you have a process group with multiple processes. Each process simultaneously performs the same function for different customers who are using your application at the same time. While each process instance has the same name, each instance runs off a unique customer-specific configuration about which Dynatrace doesn’t have any information. Dynatrace therefore aggregates all related processes into a single process group in order to facilitate monitoring.
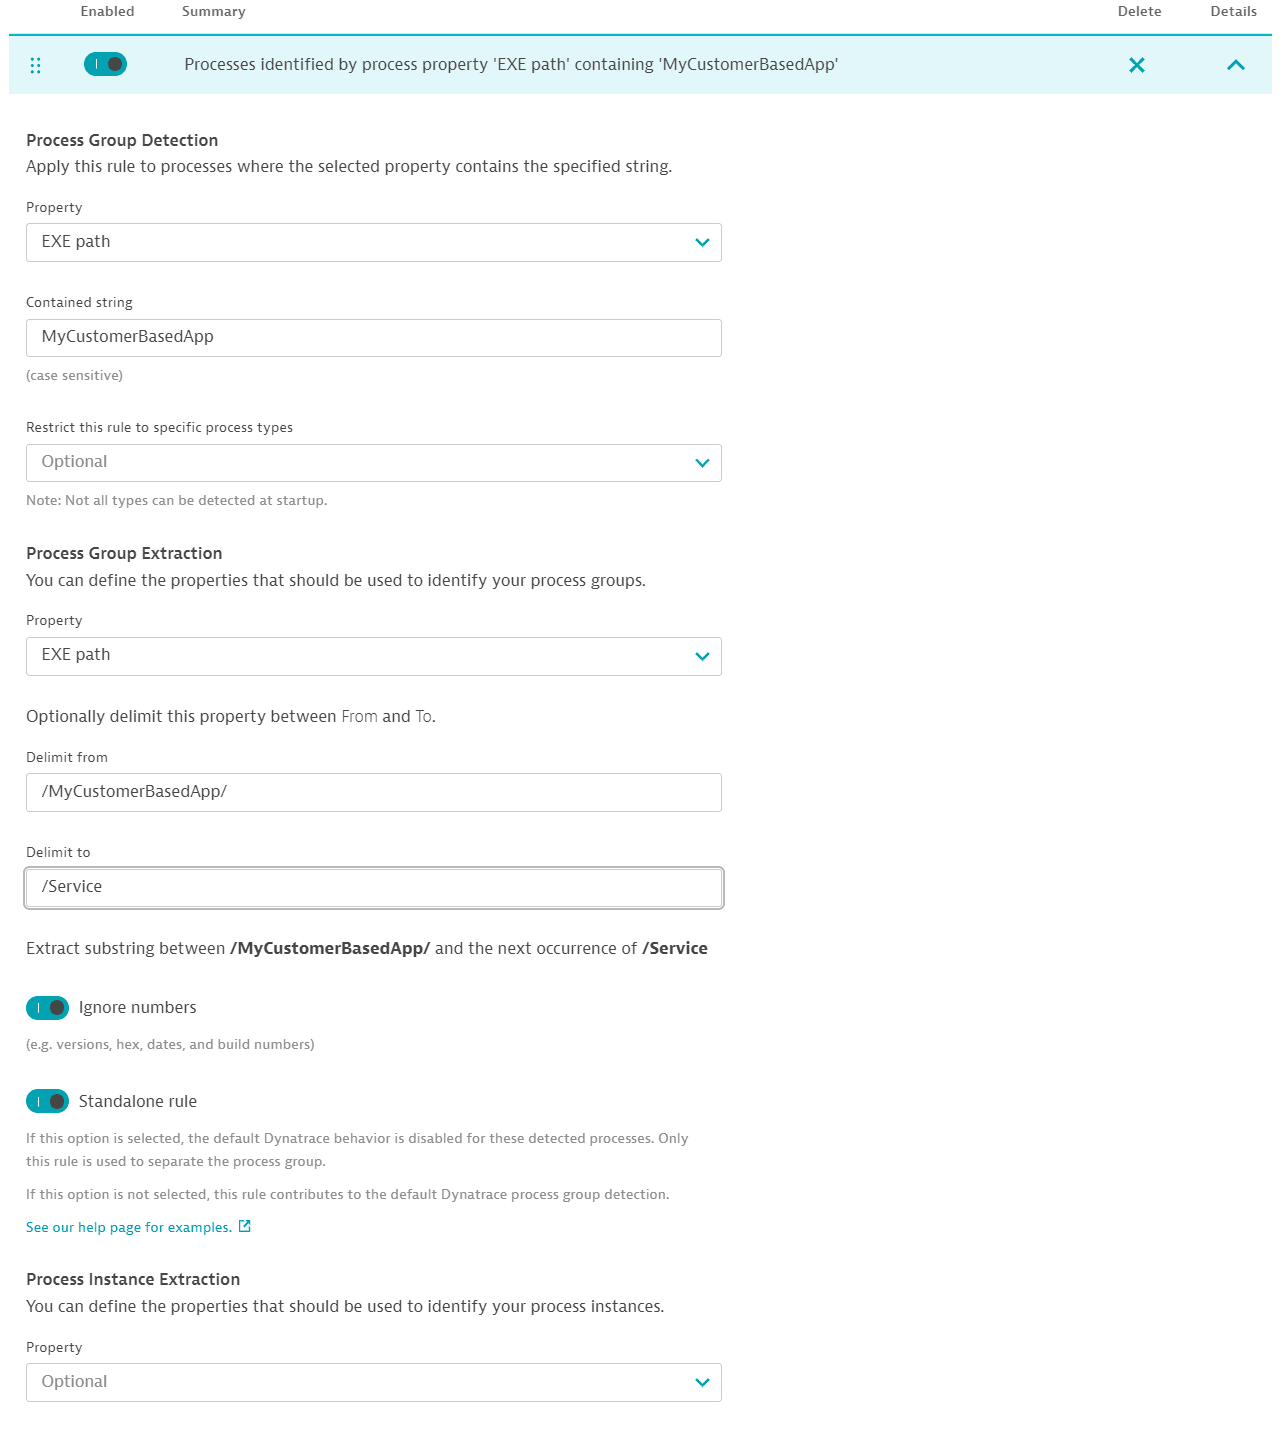
For cases where such grouping is inadequate, you have the option to define process-group detection rules that take into account customer-specific details. Such details can be drawn from your unique deployment scheme. If you have a directory structure that includes a customer ID (for example, /opt/MyCustomerBasedApp/<CustomerId>/Service/MyService), and the directory structure is the same across all your hosts, you can create a customer-specific process-group detection rule that works across all process instances.
Example:
You can create a rule that applies to processes with executable paths containing the phrase MyCustomerBasedApp. For processes that match this requirement, the string between /MyCustomerBasedApp/ and /Service in the Executable path is extracted and used to uniquely identify each process instance.
When to disable this option
You can disable the Standalone rules option when, within the same environment, you want to differentiate between separate entities (for example, production vs. testing). In this case, you may want to use the default detection by Dynatrace, but enhance it with your own knowledge of the deployment setup.
You have the option to define a second property that identifies specific process instances (or cluster nodes) within a process group. This is useful if your process group setup has specific names per instance. If you're not sure, leave the field empty. The default setting is one node per host.
Example:

-
If none of the above process group detection options works, you can use the environment variable DT_CLUSTER_ID to group all processes that have the same value for this variable. All processes found in a monitoring environment that share the same cluster ID are treated as members of the same process group, and are separated only by the hosts they run on (for example, clusters of Apache web servers that belong together and host the same site). Make sure you set the DT_CLUSTER_ID variable only on a process-by-process basis, not system wide! If you set this variable system-wide, all processes may be grouped into a single process group for monitoring. This is undesirable and unsupported.
-
To identify nodes within a process cluster that run on the same host, use the DT_NODE_ID environment variable. This tells Dynatrace which processes should be taken as separate process group instances.
Declarative process grouping
OneAgent version 1.217+
Within large, dynamic environments, the number of processes running on your hosts can become overwhelming. For this reason, Dynatrace automatically monitors important process group types—process groups that are either of a known technology or that consume significant resources.
However, Dynatrace also provides the option of monitoring specific processes that fall into neither of these two categories. This means that you can monitor processes of a technology type unknown to Dynatrace that don't consume significant resources.
Declarative grouping works only for processes that aren't deep-monitored.
Be cautious when using declarative process grouping, as it may cause compatibility issues with extensions or plugins that depend on Process Group Instance (PGI) names or technologies. Such modifications can lead to malfunctions and loss of data or metrics in monitored processes.
To create such a process group, use the declarative process-grouping feature, which enables you to add fine-grained rules to match any specific process group. Declarative process grouping is based on the Settings 2.0 framework, so you can create the rules using the Dynatrace web UI or the Settings API - see Example JSON payload for a declarative process group configuration.
To create a process group using the Dynatrace web UI
-
Go to Settings.
-
Select Processes and containers > Declarative process grouping.
-
Select Add monitored technology. The technology is a logical container to group detection rules. It will be visible as the main technology of the process group.
-
Select Add process group. A process group can comprise a number of individual detection rules. A process group is identified if all of the individual detection rules match.
-
Under Process group display name, select a process group name.
-
Enter Process group identifier. The process group identifier is a unique string to let Dynatrace identify the process group.
-
OneAgent version 1.259+ Select a Report process group option:
- Always—the created process group is always reported to Dynatrace.
- Never—the created process group is never reported to Dynatrace.
- Only when resource usage is high—the created process group is reported if CPU, memory, or network traffic usage is over 5%.
-
Select Add detection rule.
-
Select the object (process property) against which your detection rule will be tested:
- Command line argument
- Executable name
- Executable path
If you add more than one detection rule, a process is identified if all the detection rules match (AND relation).
-
Enter a Condition.
In the previous step, you selected the process property that you want to examine (for example, the executable path). In this step, you specify a condition (an operator and a string) that is compared to the selected process property. You can use one of the following operators:
-
$prefix= starts withFor example,
$prefix(/usr/sbin/keepalived)is true if the selected process property starts with/usr/sbin/keepalived. -
$suffix= ends withFor example,
$suffix(keepalived)is true if the selected process property ends withkeepalived. -
$eq= equals; exactly matchesFor example,
$eq(-d)is true if the selected process property is-d. -
$contains= contains; has this substringFor example,
$contains(keepalived)is true ifkeepalivedoccurs anywhere in the selected process property.
-
-
When you finish defining all the rules, select Save changes.
After saving your changes, Dynatrace will automatically detect and monitor the newly defined custom process group across all hosts—even on hosts that are launched following the definition of the custom process group.
Manage declarative process grouping
To manage declarative process groups
-
Go to Declarative process grouping for the level you are configuring.
- Go to Hosts or Hosts Classic (latest Dynatrace).
- Find and select your host to display the host overview page.
- In the upper-right corner of the host overview page, select More (…) > Settings.
- In the host settings, select Declarative process grouping.
- Go to Deployment Status and then select OneAgents.
- On the OneAgent deployment page, turn off Show new OneAgent deployments.
- Filter the table by
Host groupand select the host group you want to configure.This displays the OneAgent deployment page filtered by the selected host group. Each listed host has a Host group:The Host group property is not displayed when the selected host doesn't belong to any host group.
<group name>link, where<group name>is the name of the host group that you want to configure. - Select the host group name in any row.
As you have filtered by host group, all displayed hosts go to the same host group.
- In the host group settings, select Declarative process grouping.
Go to Settings and select Processes and containers > Declarative process grouping.
-
The declarative process groups you have defined are displayed in a table under the Add monitored technology button.
- To stop monitoring a listed process group, turn off Enabled.
- To delete a process group from the table, select
 in the Löschen column.
 - To view and edit process group details, select
 in the Details column.
Easy configuration with Settings API
Using the Settings API, you can easily
- Change the definition of your process groups
- Set up a simple or an advanced detection rule
- Configure a declarative process group detection
To use the Settings API
-
Create an API token and enable the Write settings (
settings.write) permission. -
Use the Get a schema endpoint to learn the JSON format required to post your configuration.
-
SchemaID:
builtin:process-group.simple-detection-rule[{"schemaId": "builtin:process-group.simple-detection-rule""scope": "environment""value": {"enabled": true,"ruleType": "env","groupIdentifier": "MY_PG_NAME","instanceIdentifier": "MY_INSTANCE_NAME","processType": "PROCESS_TYPE_APACHE_HTTPD"}}]
-
SchemaID:
builtin:process-group.advanced-detection-rule[{"schemaId": "builtin:process-group.advanced-detection-rule""scope": "environment""value": {"enabled": true,"processDetection": {"property": "JBOSS_SERVER_NAME","containedString": "MyJBossServer","restrictToProcessType": "PROCESS_TYPE_JBOSS"},"groupExtraction": {"property": "COMMAND_LINE_ARGS","delimiter": {"from": "-environment=","to": "-","removeIds": true},"standaloneRule": false},"instanceExtraction": {}}}]
-
SchemaID:
builtin:declarativegrouping[{"schemaId": "builtin:declarativegrouping""scope": "environment""value": {"name": "keepalived","detection": [{"id": "keepalived","processGroupName": "keepalived","rules": [{"property": "executable","condition": "$eq(keepalived)"},{"property": "executablePath","condition": "$prefix(/usr/sbin/keepalived)"},{"property": "commandLine","condition": "$eq(-d)"}]}]}}]
-
-
Use the Post an object endpoint to send your configuration.
Add your configuration to Extensions 2.0
You can also attach your current configuration to your Extensions 2.0 extension so that your custom extension comes with predefined process grouping rules. Add your definition to the Extension YAML file as in this example:
---name: custom:my-extensionversion: 1.0.0minDynatraceVersion: "1.218"author:name: Joe Doeprocesses:- name: keepaliveddetection:- id: ext.keepalivedprocessGroupName: keepalivedrules:- property: executablecondition: "$eq(keepalived)"- property: executablePathcondition: "$prefix(/usr/sbin/keepalived)"- property: commandLinecondition: "$eq(-d)"