This app recognizes faces in images that are uploaded to Cloudinary and will auto tag images with their names. It uses Amazon Rekognition Service to index and detect the faces.
To accomplish auto tagging of faces, this app learns people’s faces from photos uploaded to the "training" folder in Cloudinary. In many cases, a single “training” photo of someone is enough for the app to learn and, later on, accurately identify and tag that person. This works in most photograph scenes and even in pictures with many other people in them.
It’s important to note that indexing and labeling faces is a private process for your organization. Each image’s’ index data is stored in your Amazon Web Services (AWS) account only.
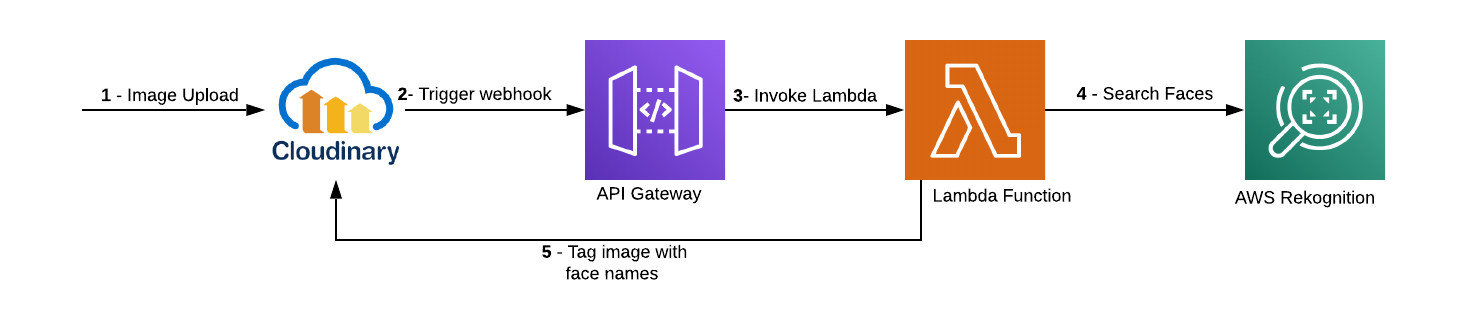
The app leverages the following services for auto-tagging images:
- Cloudinary: For uploading, tagging, and managing images.
- Amazon Rekognition: For indexing facial images and searching them for facial matches.
- AWS Lambda: For calling Amazon Rekognition APIs for indexing and searching.
- Amazon API Gateway: For exposing the Lambda function through API, which Cloudinary then registers as a web hook.
This flow takes the images uploaded to Cloudinary, invokes Amazon Rekognition, which then indexes the faces and stores them into a Amazon Rekognition collection.

This flow takes the images uploaded to Cloudinary, invokes Amazon Rekognition, and searches for the faces in those images that match the indexed faces in the trained collection.
Follow the steps below to configure and deploy the app.
As a preliminary step, register for an AWS account and a free Cloudinary account.
You must deploy the app as a Lambda function on Node.js runtime. This app has been tested with NodeJS version v12.3.1. Details on building Lambda Functions with Node.js can be found at - https://docs.aws.amazon.com/lambda/latest/dg/programming-model.html
Follow these steps to deploy the app on lambda:
-
Clone the project
-
cd cloudinary-face-rekognition/lambda -
npm i -
If you need to deploy this app to a Linux environment and if the app is packaged on non-Linux machines such as OS X and Windows, run the commands below. This will setup Sharp module (required for face extraction from images) for Linux environment. Additional details at - https://github.com/lovell/sharp/blob/master/docs/install.md
rm -rf node_modules/sharpnpm install --arch=x64 --platform=linux --target=10.15.0 sharp -
zip -r cloudinary-face-rekog.zip cld-utils.js index.js node_modules/ -
Upload the zip file to Lambda function
-
Ensure that ‘Execution role’ on the Lambda function has the
AmazonRekognitionFullAccesspolicy attached. -
Set the Lambda timeout to 1 minute and memory to 512 MB. You can tweak these values as needed.
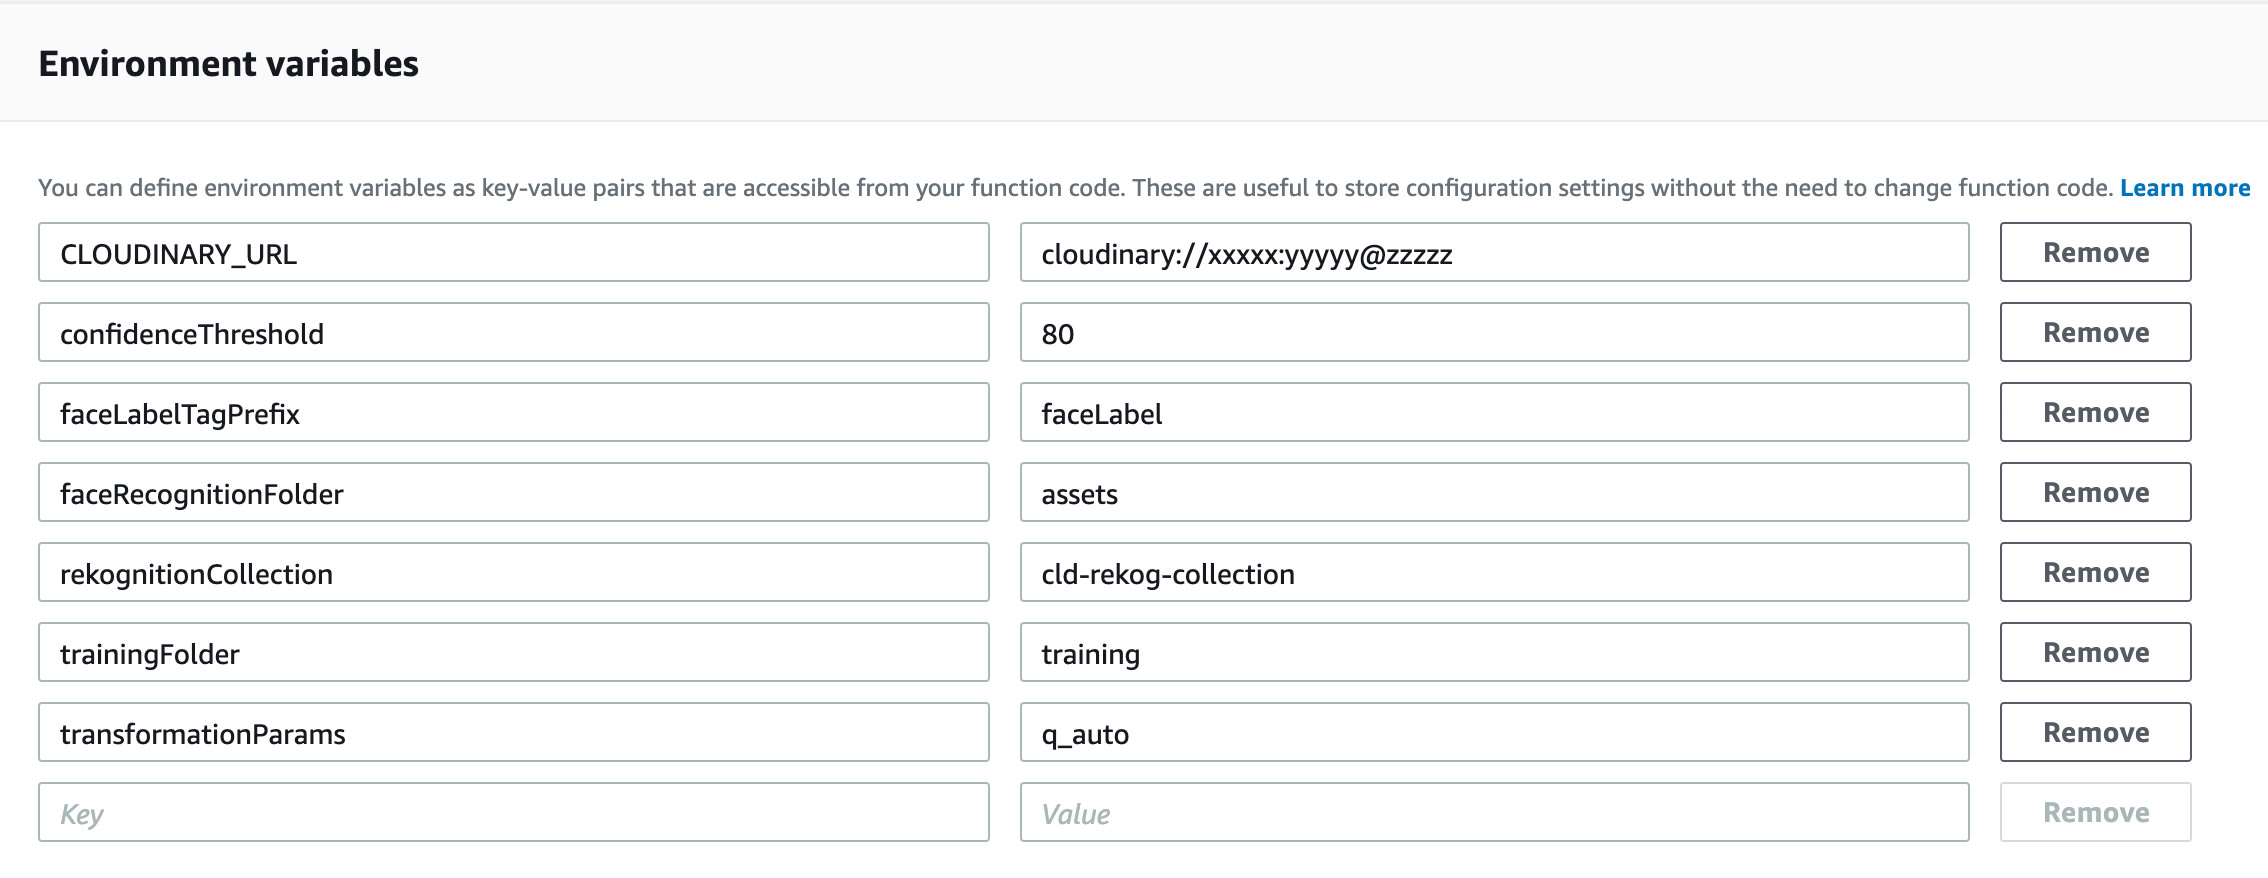
The lambda function requires the following environment variables :
-
CLOUDINARY_URL: The URL that is required for making API calls to Cloudinary. To look up that URL, log in to Cloudinary and go to its Console for the value. -
trainingFolder: The name of the Cloudinary folder, for example,training, in which to upload images. Amazon Rekognition will index the faces from this folder. -
faceRecognitionFolder: The name of the Cloudinary folder, for example,assets, in which to upload images for searches. -
rekognitionCollection: The name of the collection in Amazon Rekognition, for example,cld-rekog, which contains the indexed faces to be used for face searches. -
confidenceThreshold: The minimum confidence-score of face matches, for example,80. The app considers a match successful if the score returned by Amazon Rekognition is at or higher than this level. -
faceLabelTagPrefix: The prefix that precedes the names of the tagged images in thetrainingfolder. The tagging syntax isfaceLabelTagPrefix:< Name>, for example,faceLabel:John Doe. -
transformationParams: The parameters that specify the transformations to apply when requesting images from Cloudinary for indexing or searching. Because original-sized images are not required for indexing or searching, I recommend that you apply, at a minimum,q_autoto reduce the image size and save bandwidth.If needed, additional image transformations can be separated by commas, such as -
q_auto,w_900,h_900. See transformation details at Cloudinary Transformation
Cloudinary integrates with Amazon Rekognition through the Amazon API Gateway. Follow these steps:
-
In the API Gateway console, import the Swagger file
api/rekog_api.yamlto set up your API by following this procedure. -
Associate the Lambda function created in step 1 with your API, like this:

Next, set up your Cloudinary environment:
-
Log in to your Cloudinary account and go to your Media Library. In the root folder, create two folders called
trainingandassets. -
Go to Upload Settings and enter in the Notification URL field the API Gateway endpoint you configured above. Cloudinary sends upload and tagging notifications to this endpoint, a requirement for this app.
Note: This notification url under settings is a global entry and will get notifications for all events from Cloudinary - even the ones that are not necessary for this app. Instead of using this global entry, you can provide notification urls when doing uploads to get upload notifications only. More details at - Upload API Reference

Now that all the components are in place, you can start using the app. First, set up a trained collection by indexing your facial images with Amazon Rekognition. In order to do this, all you have to do is upload them to the training folder.
Note To create a trained collection, upload single-face images only to the training folder. Multiple-face images are not supported for this app.
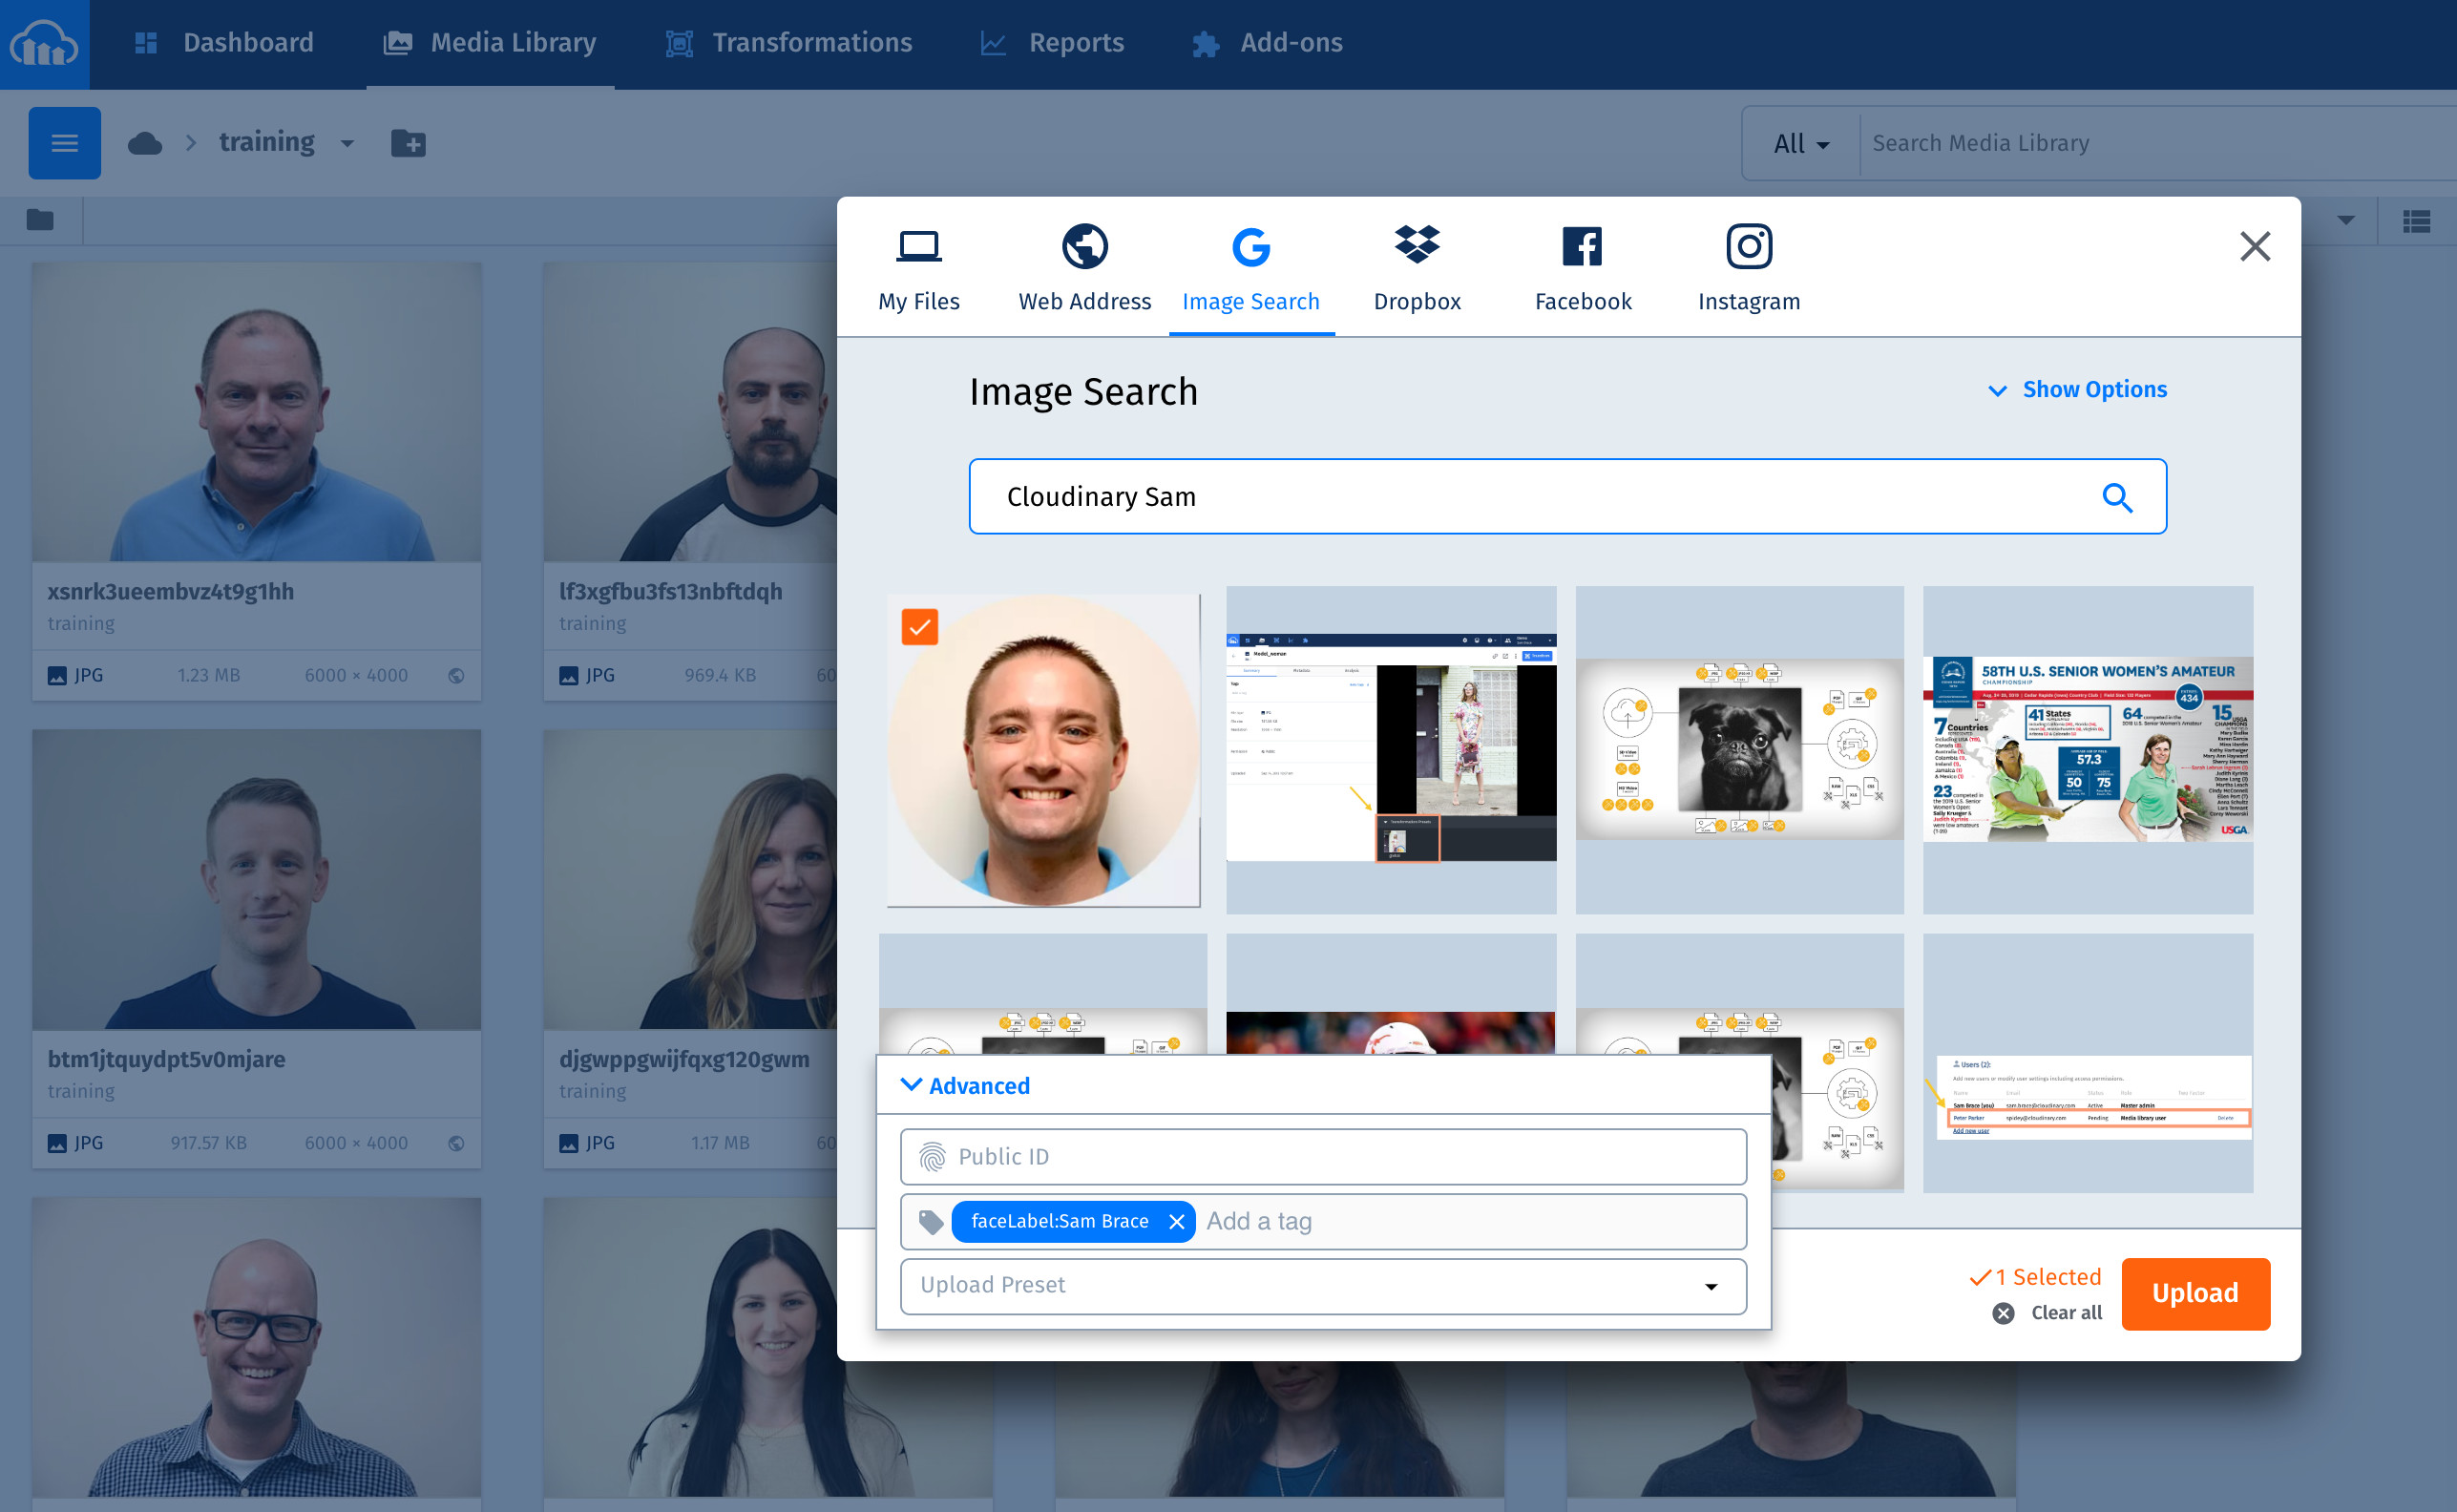
You can upload images to Cloudinary in several ways. The steps below do that with the upload widget in the Cloudinary Console :
- Go to your Cloudinary Media Library.
- Navigate to the ‘training’ folder
- Click Upload on the top right-hand corner.
- Click the Advanced link at the bottom of the upload widget that is displayed.
- Enter a tag according to the syntax
faceLabel:<Name>, for example,faceLabel:John Doe. - Click to select an image to upload from any of the sources available on the upload widget.
Repeat the above procedure to train all the images you’re targeting for facial recognition.
Alternatively, you can upload training images in bulk through Cloudinary’s SDK. This doesn’t require Lambda Function and can be done from any NodeJS environment. Just ensure the node modules are installed and environment variables as stated above are defined.
-
If your trainable images that are tagged with
faceLabel:<name>are already in a training folder, call theindexFacesfunction onlambda/index.js. That function the accepts the training folder name, retrieves all the images from the folder, and indexes the ones with thefaceLabeltag, as in this code:const cld_rekog = require('./index') cld_rekog.indexFaces('training/');
-
If you have a list of the URLs and tags for all your images, call the
uploadAndIndexfunction onlambda/index.js. That function then uploads the images, one by one, to Cloudinary, tagging and indexing them during the process. See this code:
const cld_rekog = require('./index')
// Assume we have three entries to upload and index as below
const imageData = [{
            url: 'https://cloudinary-res.cloudinary.com/image/upload/q_auto/profile_marissa_masangcay.jpg',
            tag: 'faceLabel:Marissa Masangcay'
        },
        {
            url: 'https://cloudinary-res.cloudinary.com/image/upload/q_auto/profile_shirly_manor.jpg',
            tag: 'faceLabel:Shirly Manor'
        },
        {
            url: 'https://cloudinary-res.cloudinary.com/image/upload/q_auto/profile_tal_admon.jpg',
            tag: 'faceLabel:Tal Admon'
        }
    ]

imageData.forEach(data => {
    indexer.uploadAndIndex(data.url, data.tag)
})
Amazon Rekognition yields fairly good results with one trained image per person. By indexing different images of the same person, however, you can grow your collection and make it robust in enabling you to search for different images of people at a certain angle, of a certain pose, with a certain expression, and so forth.
Additionally, Amazon Rekognition returns many details that pertain to indexed faces, such as facial coordinates, poses, and such, which you could use in apps. To learn the specifics, see the related documentation for Amazon Rekognition.
Subsequent to an image upload, the following takes place:
- Cloudinary invokes the API Gateway endpoint defined in the Notification URL field in the Upload Settings screen of your Cloudinary Media Library.
- The API Gateway invokes the Lambda function with image-upload data from Cloudinary.
- The Lambda function checks the upload response and, if it verifies that the image has been uploaded to the
trainingfolder with afaceLabeltag, indexes the image via Amazon Rekognition.
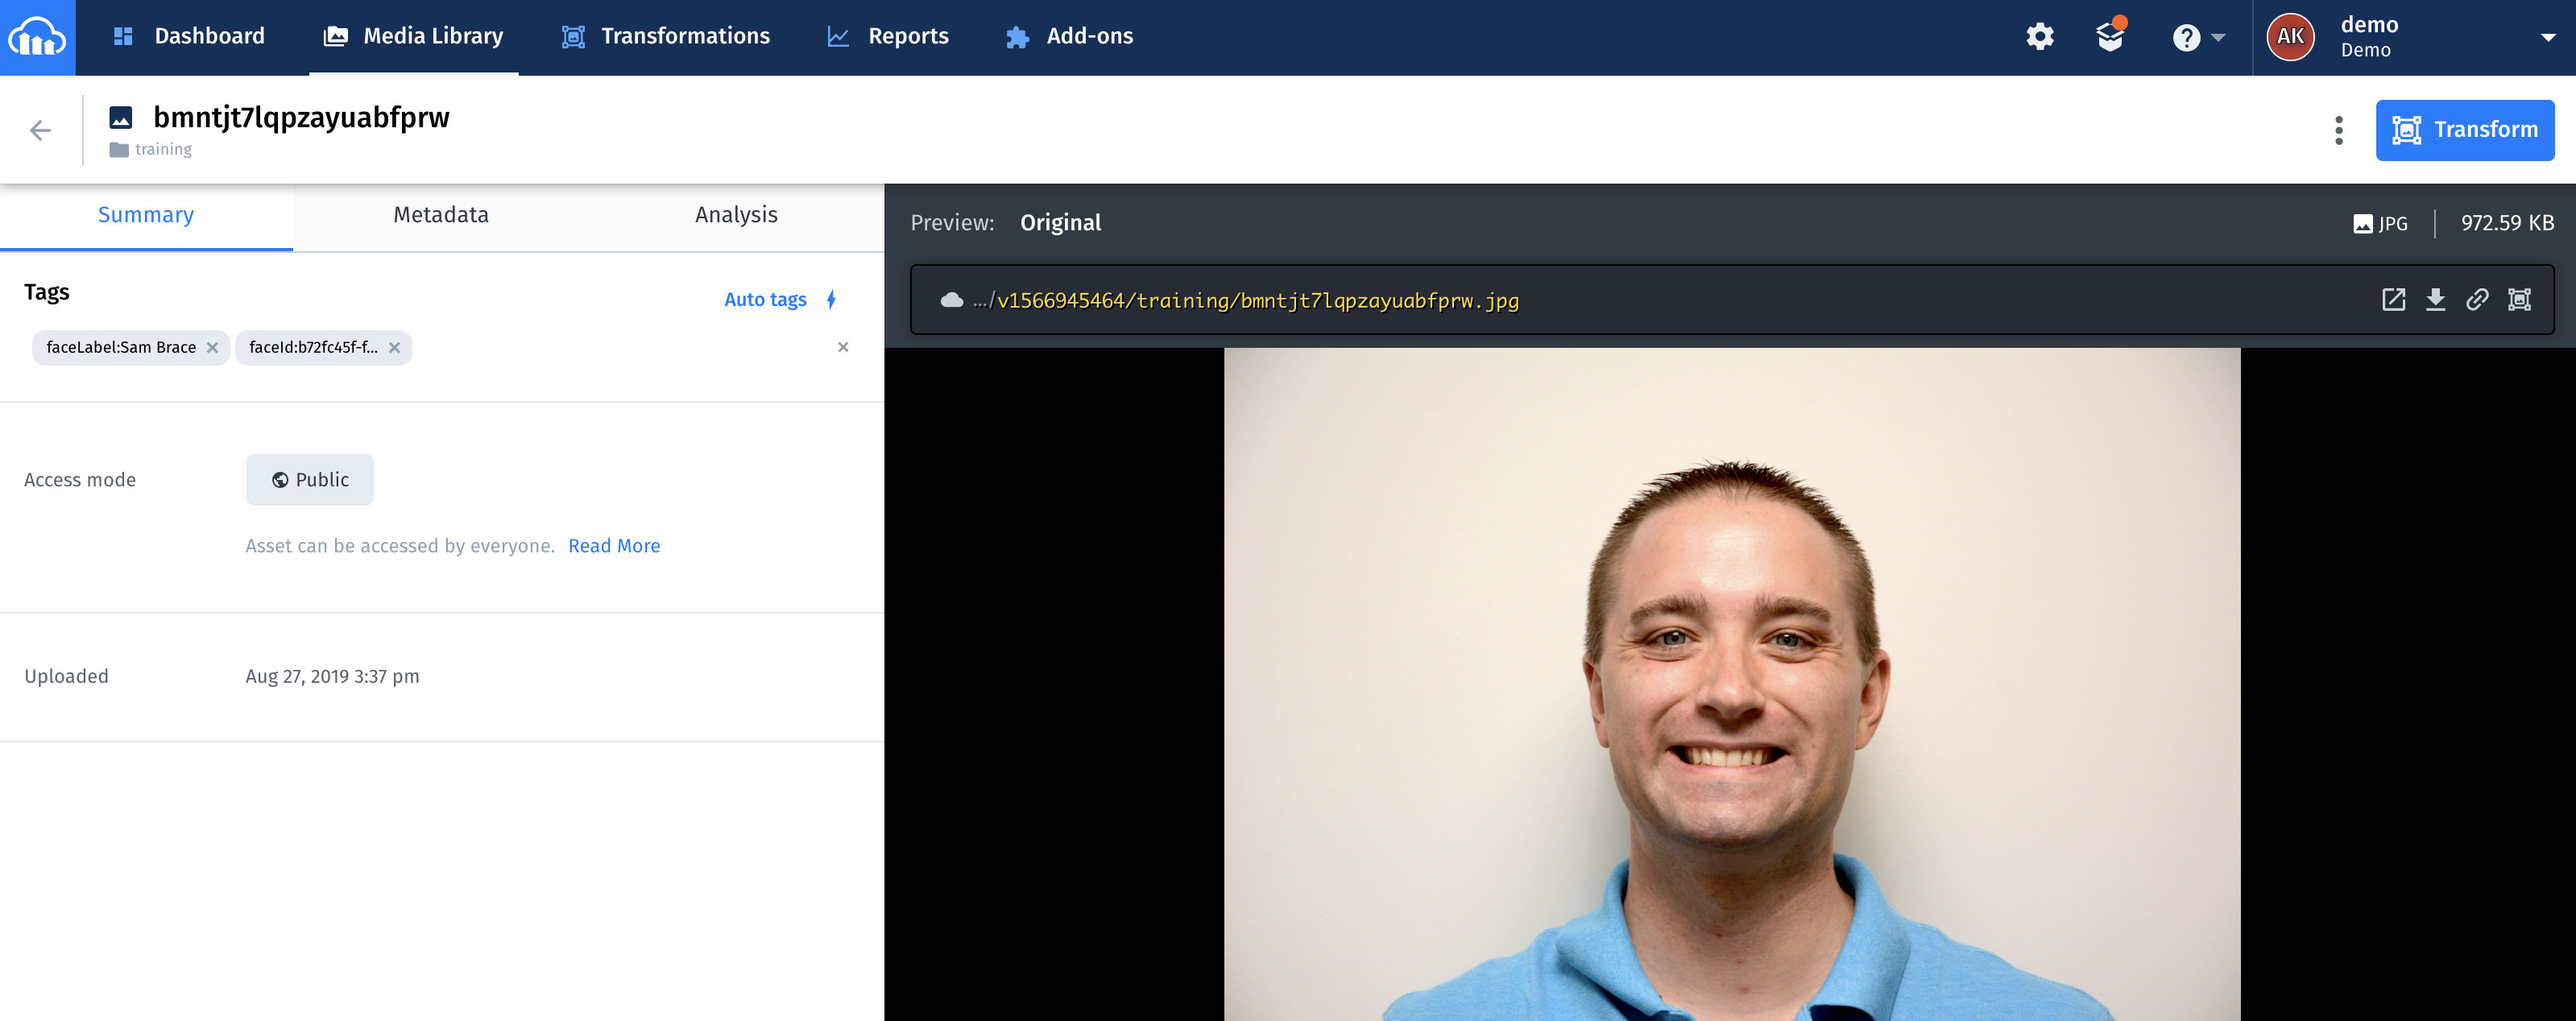
Once indexing is complete, faceId is displayed as an image tag, such as the one below. Refresh the page to see faceId.
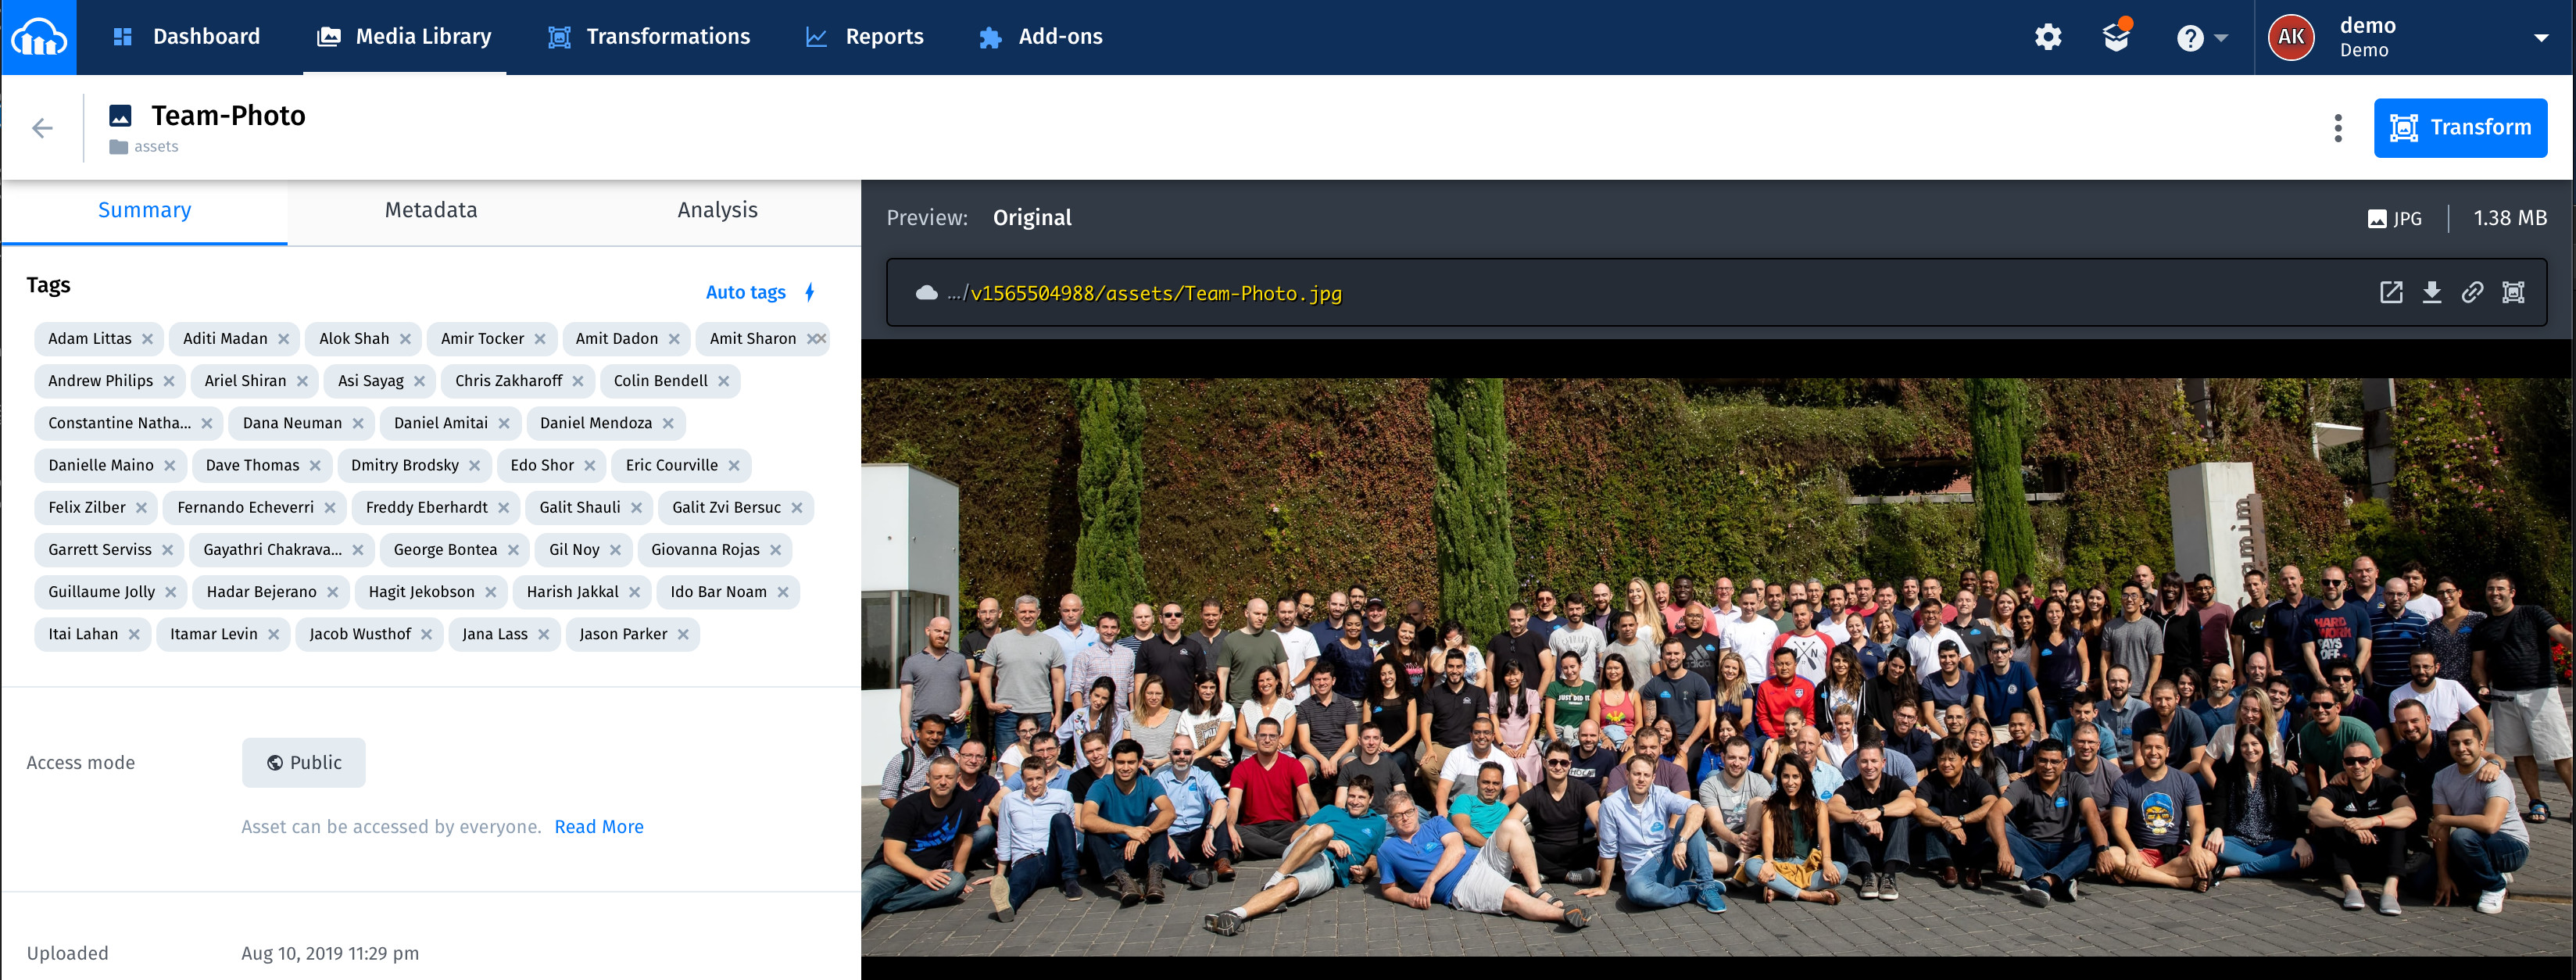
Finally, test the app. Start by uploading images into the assets folder. Feel free to upload multi face images in addition to single-face ones. If face matches are found, the app shows the related names as tags on the images. The entire process usually takes several seconds for images with a few faces and up to 25-30 seconds for images that contain many faces.
Refresh the page to see the tags.
These two screenshots are examples of a successful facial tagging:

- Amazon Rekognition can detect up to 100 of the largest faces in an image. If there are more, Amazon Rekognition skips detecting some faces. See the details in the https://docs.aws.amazon.com/rekognition/latest/dg/faces-detect-images.html.
- The sample code on this app is to demonstrate how Cloudinary can be integrated with Amazon Rekognition service to detect faces and auto tag images. It is not a complete code with security and error handling and thus is not recommended for Production as-is.
Please follow guidelines below to implement security
- In order to validate if the incoming request to Lambda function is from Cloudinary please see https://cloudinary.com/documentation/upload_images#verifying_notification_signatures
- In order to control access to API on API Gateway please see https://docs.aws.amazon.com/apigateway/latest/developerguide/permissions.html