Back pain is not amusing, regardless of how you slept in an unusual position or had a bad posture while working at your desk. Yoga can help with sciatica pain! Finding out what is really creating the distress is the first step toward getting rid of it. Maybe muscle cramps? An irritated sciatic nerve resulting in sciatica is another possibility.
But, what exactly is sciatica? It’s a discomfort in the lower back due to pinched or irritated sciatic nerves. The sciatic nerve starts in your lower back and splits into two branches, travelling between your hips and the backs of your thighs towards your knees.
What is sciatica and how can yoga help?
1. Child’s Pose (Balasana)
2. Half Moon Pose (Ardha Chandrasana)
3. Cobra Pose (Bhujangasana)
4. Cat-Cow Pose (Marjaryasana/Bitilasana)
5. Locust Pose (Salabhasana)
6. Bridge Pose (Setu Bandha Sarvangasana)
7. Downward-Facing Dog (Adho Mukha Svanasana)
8. Knees-To-Chest Pose (Apanasana)
9. Legs-Up-the-Wall Pose (Viparita Karani)
10. Wind-relieving Pose (Pawanmuktasana)
Yoga Poses To Avoid
Frequently Asked Questions (FAQs)
What is sciatica and how can yoga help?
‘Sciatica’ is the medical term for sciatic nerve pain. If the sciatic nerve is strained, compressed, inflamed, or injured, this happens. Let’s go a little more into how you might use yoga’s healing properties to avoid, relieve, and treat sciatica.
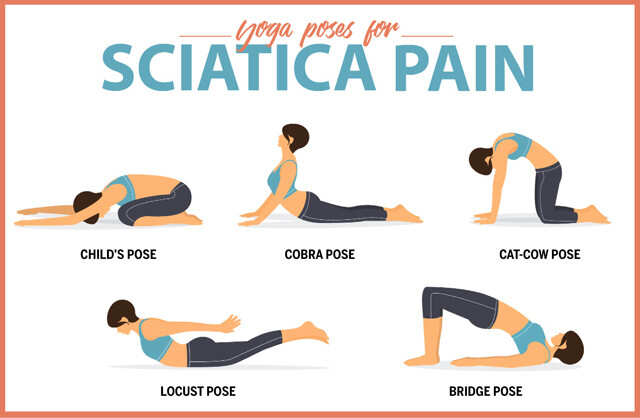
A mild yoga practice can greatly aid in the relief of sciatic discomfort. Back pain and sciatica sufferers might benefit greatly from yoga asanas combined with mindful, calm breathing. It provides patients with the necessary aid to manage their discomfort and avoid major problems. Here are some of the Poses and Stretches For Sciatica Pain Relief that you can try safely.
Tip: A relaxed mind helps when you do the pose.
1. Child’s Pose (Balasana)
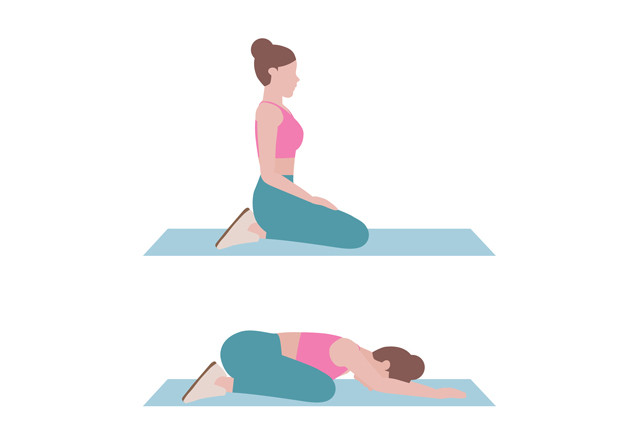
Image: Shutterstock
Child’s Pose is a fantastic method to connect with your body and soothe it. This promotes flexibility and mobility in your hips, thighs, and lower back by lengthening and stretching your spine.
How to do it -
- Sit with your knees together on the centre of your mat.
- Extend your knees as far as the mat allows.
- Keep your big toes touching but your heels apart. Stretch your arms forward until your brow and arms are on the mat.
- Lower your shoulders away from your ears and rest your elbows on the mat. As you drop your hips down toward your heels, maintain a relaxed posture and feel your sides stretch.
- Take a few deep breaths while closing your eyes.
Tip: Place a pillow or bolster beneath your legs, chest, and forehead for more support.
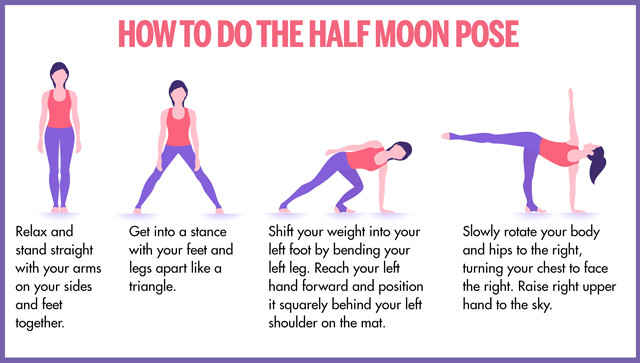
2. Half Moon Pose (Ardha Chandrasana)
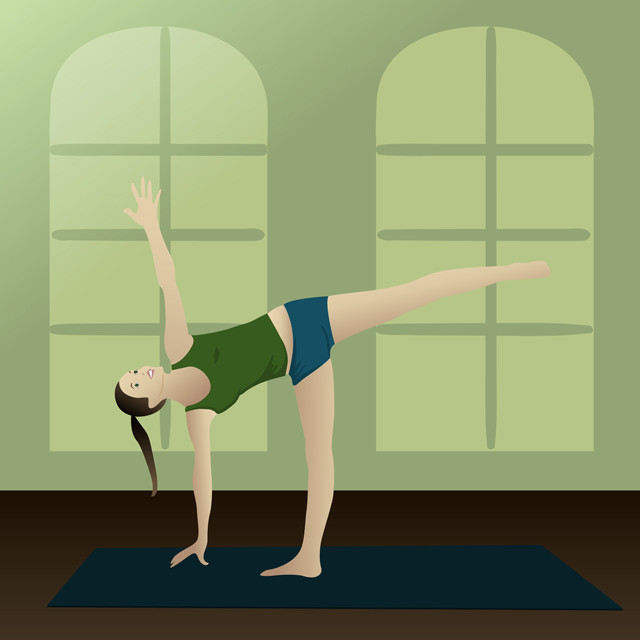
Image: Shutterstock
Half Moon Pose helps to develop balance and stabilize your body. It relaxes your spine, glutes, and thighs while increasing flexibility and relieving stress.
How to do it -
- Relax and stand straight with your arms on your sides and feet together.
- Get into a stance with your feet and legs apart like a triangle.
- Turn your head to stare at the floor with your right hand on your hip.
- Shift your weight into your front foot by bending your front leg.
- Reach your front hand forward and position it squarely behind your front shoulder on the mat or a block.
- To keep yourself stable, press down with your fingertips.
- Raise your rear leg till it’s parallel to the ground.
- Slowly rotate your body and hips to the right, turning your chest to face the right.
- Raise your upper hand to the sky. If you can, maintain your attention on the floor; if not, take it easy on your knees!
- Before releasing and repeating on the opposite side, hold for five breaths.
Tip: Do this stance against a wall to keep yourself balanced. You may lay a yoga brick underneath your hand.
3. Cobra Pose (Bhujangasana)
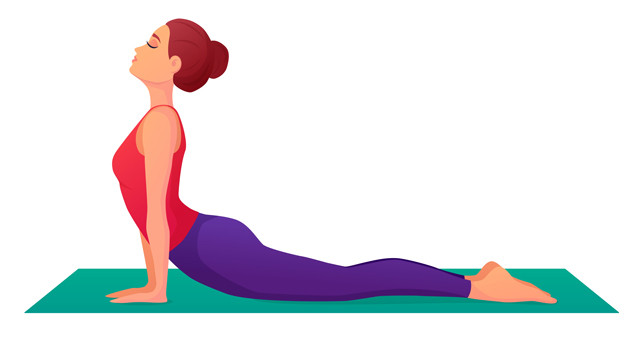
Image: Shutterstock
This relaxing position strengthens and extends your spine while also increasing blood flow and flexibility.
How to do it -
- Place your hands beneath your shoulders and lie on your stomach.
- Squeeze your elbows tightly against your body.
- Lift your head, chest, and shoulders by inhaling.
- Maintain an open chest and a small bend in your elbows.
- Thighs, lower back, and abdominals should all be engaged.
- Hold the position for up to 30 seconds.
- Repeat 2–3 times after releasing the posture.
Tip: Since most of us favour one arm over the other, your back weight may be imbalanced to one side. Bring both arms into activity and feel the pressure along the backbone in the middle of your back.
4. Cat-Cow Pose (Marjaryasana/Bitilasana)
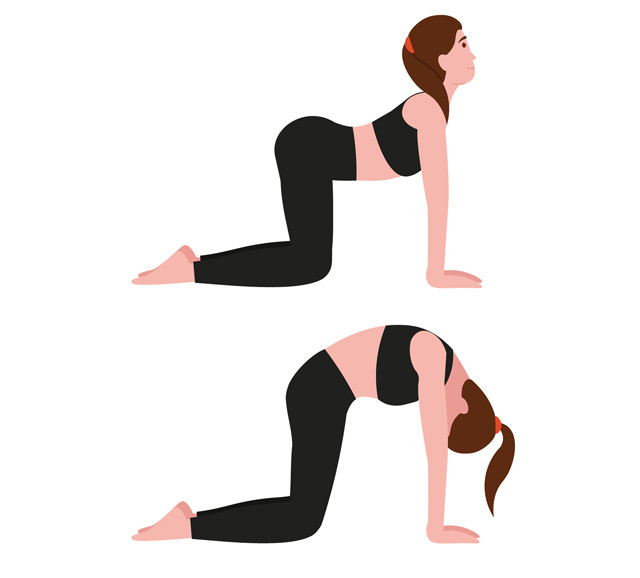
It requires shifting the spine from a rounded (flexion) to an arched posture (extension). This is a basic vinyasa since each movement is done in combination with either an inhale or exhale of the breath.
How to do it -
- Kneel on the floor. Lean forward and lay your palms on the floor right below your shoulders, aligning your hands and thighs with the ground. This is referred to as the Tabletop position.
- Inhale while arching your back upwards and lifting your head.
- Hold for a minute or two.
- Exhale and flex your back downwards while lowering your chin to your chest, i.e. Hunch your shoulders.
- Hold for a minute or two.
Tip: If you have a neck injury, maintain your head aligned with your torso and don’t lower it forward or backward.
5. Locust Pose (Salabhasana)

Image: Shutterstock
The spine, glutes, and thighs are all strengthened in this position. It supports your lower back and core. It also helps to improve hip circulation and flexibility.
How to do it -
- Place your fingers at the base of your spine and lie on your stomach.
- Slowly raise your torso, head, and arms to the highest point possible.
- Raise your arms over your head and away from your body.
- Raise both legs at once or one leg at a time to get deeper.
- Make use of your glutes, lower back, and abs.
- Hold the position for up to 30 seconds.
- Return to the starting position after releasing the posture.
- For a few breaths, rest and relax your body while gently shifting your hips from side to side.
- Repeat twice more.
Tip: Salabhasana should not be performed too rapidly or too highly since it might cause cramping in the soles of the feet, damaged hamstrings, or lower back pain.
6. Bridge Pose (Setu Bandha Sarvangasana)
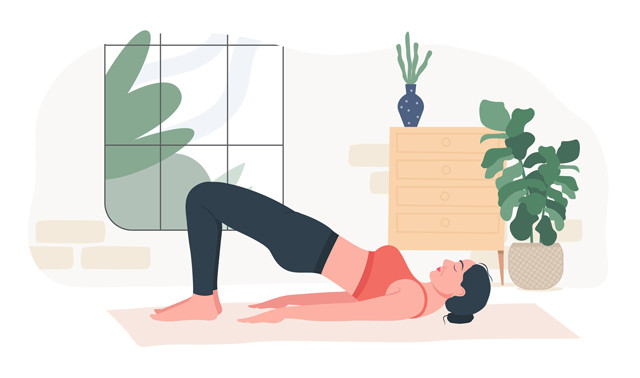
Image: Shutterstock
The spine is stretched in a Bridge Pose, which relieves pain and stress. It stimulates circulation by gently stimulating the body. It also strengthens your legs, glutes, and core.
How to do it -
- Lie down on your back, knees bent and heels pressed on your hips.
- With your hands facing down, bring your arms alongside your body.
- Raise your hips as high as possible while slowly lifting your spine from the floor.
- Keep alignment by placing a block between your knees or thighs.
- Slowly return to your original position.
- Repeat this exercise ten times more.
- In the initial position, relax your body.
- Hold the stance for 1 minute in the top position.
Tip: If your neck is painful or tight, place a folded blanket beneath your shoulders and upper arms.
7. Downward-Facing Dog (Adho Mukha Svanasana)
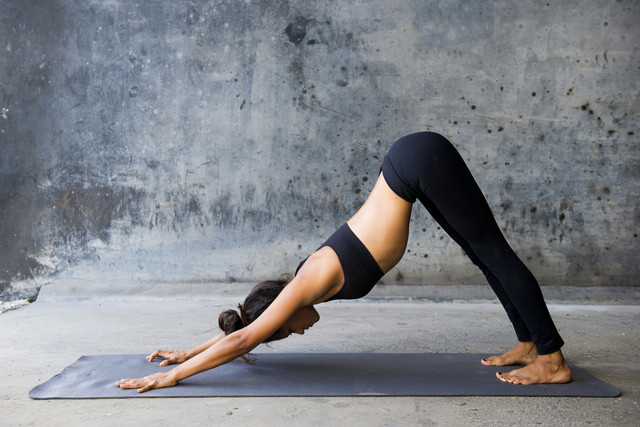
Image: Shutterstock
This forward bend helps to correct your body, alleviating discomfort and tension. Downward-Facing Dog strengthens your entire body while correcting imbalances. Holding this pose for about a minute can do wonders for the pain. It is a remarkably simple pose that also has other benefits like elongating the body and strengthening hands, wrists, and fingers.
How to do it -
- Begin by getting down on your hands and knees. As you elevate your hips toward the ceiling, press against your hands.
- Drop your head down to align your ears with your upper arms, or pull your chin into your chest.
- Bend your knees and lean your pelvis forward slightly.
- Move your body intuitively through any variations that feel suitable.
8. Knees-To-Chest Pose (Apanasana)
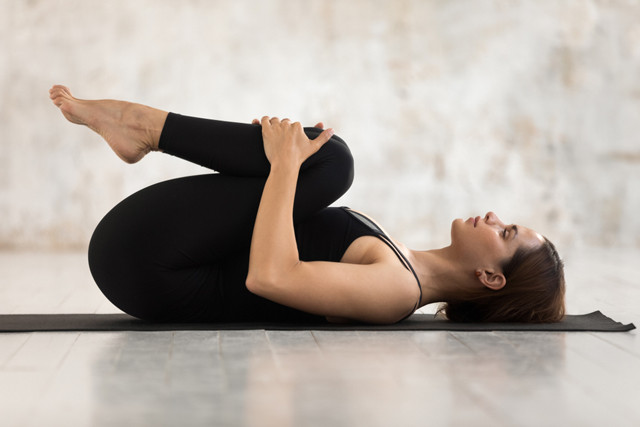
Image: Shutterstock
The knees-to-chest pose stretches the muscles in your lower back as well as the piriformis, a pear-shaped muscle deep in your buttock. This is a fantastic pose for releasing tension in the lower back, hips, and glutes. To reduce the intensity of the pose, practise one leg at a time and hold the stance for at least a minute.
How to do it -
- Lie on your back with your legs drawn in toward your chest.
- As you stretch your hands around the backs of your thighs or around your shins, draw your ankles and knees together.
- If your hands are long enough, interlace your fingers or grab opposite elbows.
- Lift your head and tuck your chin into your chest to intensify the stretch.
9. Legs-Up-the-Wall Pose (Viparita Karani)

Image: Shutterstock
This is the ultimate restorative pose for your body, allowing it to rest, relax, and recuperate. Viparita Karani yoga pose is a standing stretch that can be beneficial for sciatica discomfort. If you're able, you can do this without assistance, or you can stand against a wall with your feet about 24 inches away from the wall.
- Place your right side against the wall and sit.
- Lie back and swing your legs up the wall, bringing your hips as near to the wall as possible.
- Put a pillow or a folded blanket beneath your chin.
- Put your arms in whatever posture is comfortable for you.
- Allow your body to fall heavy as you relax entirely.
- Hold this stance for up to 20 minutes.
10. Wind-relieving Pose (Pawanmuktasana)
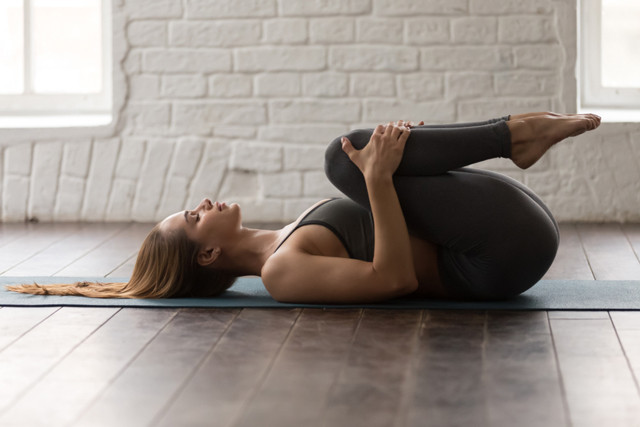
Image: Shutterstock
This one is properly titled! Sciatica and gassy bloat are relieved by the wind-relieving posture. It will also relax your back, hips, and glutes. If the wind pose becomes too painful for your back or tummy, try doing it one leg at a time. Hold the stance for at least one minute to get the full effect. Wind relieving yoga pose not only relieves gas and bloating but also improves blood circulation in the hip joints and relieves lower back tension.
- Lie on your back with your legs drawn in toward your chest.
- Keep your ankles and knees together while wrapping your hands around to grip the fronts of your shins or the backs of your thighs.
- Grab opposing elbows with your hands or fold your hands together in the middle of it's more comfortable.
- That's all! Roll your head forward until your chin contacts your chest to intensify the stretch.
Yoga Poses To Avoid
Forward bends in the seated and standing positions (except Downward-Facing Dogs) should be avoided since they put additional strain on the pelvis and lower back. Forward bends may be done while lying down (lying down, face up). This aids with hip and lower back support.
Tip: Listen to your body when in pain. Do not force yourself to do the poses if the pain worsens.
Frequently Asked Questions (FAQs)
Q. Does yoga make sciatica worse?
A. Generally, any position practiced very rapidly or too intensely can overwork the sciatic nerve and worsen discomfort. Forward folds are no exception. Flexing or folding at the waist could seriously damage sciatica.
Q. Why does yoga aggravate sciatica?
A. Since yoga has some asanas and positions that could strain the back and legs for someone suffering from sciatica, all yoga poses are not advisable.Q. How do you release sciatica?
A. Here is an easy stretch to release the nerve. Begin by lying on a flat surface and raising and pulling the affected leg towards the shoulder. Hold the leg in that posture for 30 seconds when there is a feeling of stretch. After that, relax and straighten the leg back to the beginning position, rest for a while, and repeat the action two more times.
Q. What is the best sitting position for sciatica?
A. To combat sciatica, sit with both feet planted on the floor, hips 8-10 degrees above the knees, and spine in an erect position. You will ease the strain on your glutes, spine, and sciatic nerve like this.
Q. What triggers sciatica?
A. Sciatica is caused by a pinched sciatic nerve. The most common cause is a herniated disc in the spine or an overgrowth of bone, known as bone spurs, on the spinal bones. A tumour can occasionally impose pressure on a nerve. A condition, such as diabetes, can also harm the nerve.
Q. What deficiencies cause sciatica?
A. Sciatica can be caused by a lack of vitamin B12 and is more common in adults over the age of 60. Vitamin B12 aids in the formation of the fatty (myelin) sheath that surrounds the nerves, which is essential for nerve function and impulse conduction.
Q. Does drinking water help sciatica?
A. Drinking plenty of water throughout the day can help relieve lower back pain by providing benefits such as keeping the spinal discs full of fluid so they can properly cushion the spine during movement and preventing the surrounding muscles from developing lactic acid, which can cause inflammation and nerve compression.
Q. How can I get rid of sciatica fast in other ways?
A. Besides yoga, there are various other ways to get rid of sciatica. Using pressure relief cushions, doing gentle exercises, using heat packs, massaging, and even having pain medication in worse conditions can help you get rid of sciatica faster.
Also Read - Yoga Asanas To Prevent And Cure Neck Pain